



Open your store, add apps and themes, and pay for each one
A complete walkthrough for store owners: sign up and pay for your package, sign in, install apps and choose app plans, buy and publish a theme, and find every charge under Settings > Billing.
Download this guide: PDF · Word (.docx)
On this page
- 1. Start your signup and create your account
- 2. Name your store and choose its address
- 3. Choose your package
- 4. Pay for the first billing cycle
- 5. Check what you receive
- 6. Sign in to your admin
- 7. Open the App Store
- 8. Read the app's listing and compare its plans
- 9. Install the app and check what it can access
- 10. Choose an app plan: free, free trial or development stores only
- 11. Pay for an app plan
- 12. Find your apps afterwards
- 13. Find a theme in the Theme Store
- 14. Preview a theme with your own store
- 15. Buy a premium theme
- 16. Customise and publish the theme
- 17. See every charge and receipt in Settings > Billing
- 18. Change or cancel your package, apps and themes
- Completion checklist
- Troubleshooting
You pay for three kinds of things in Lulu, and each one is paid separately: your package (Basic $20, Grow $50 or Advanced $290 a month in USD, or Plus from $1,950 a month by agreement), the plan of each app you choose to pay for, and each premium theme you buy. There is no free package: the first billing cycle is paid on a secure payment page during signup, and your store is created only when that payment goes through. Apps and themes are optional; many apps have a free plan and every theme can be tried free before you buy it. All prices are in USD. Have a card ready and about 15 minutes.
Start your signup and create your account
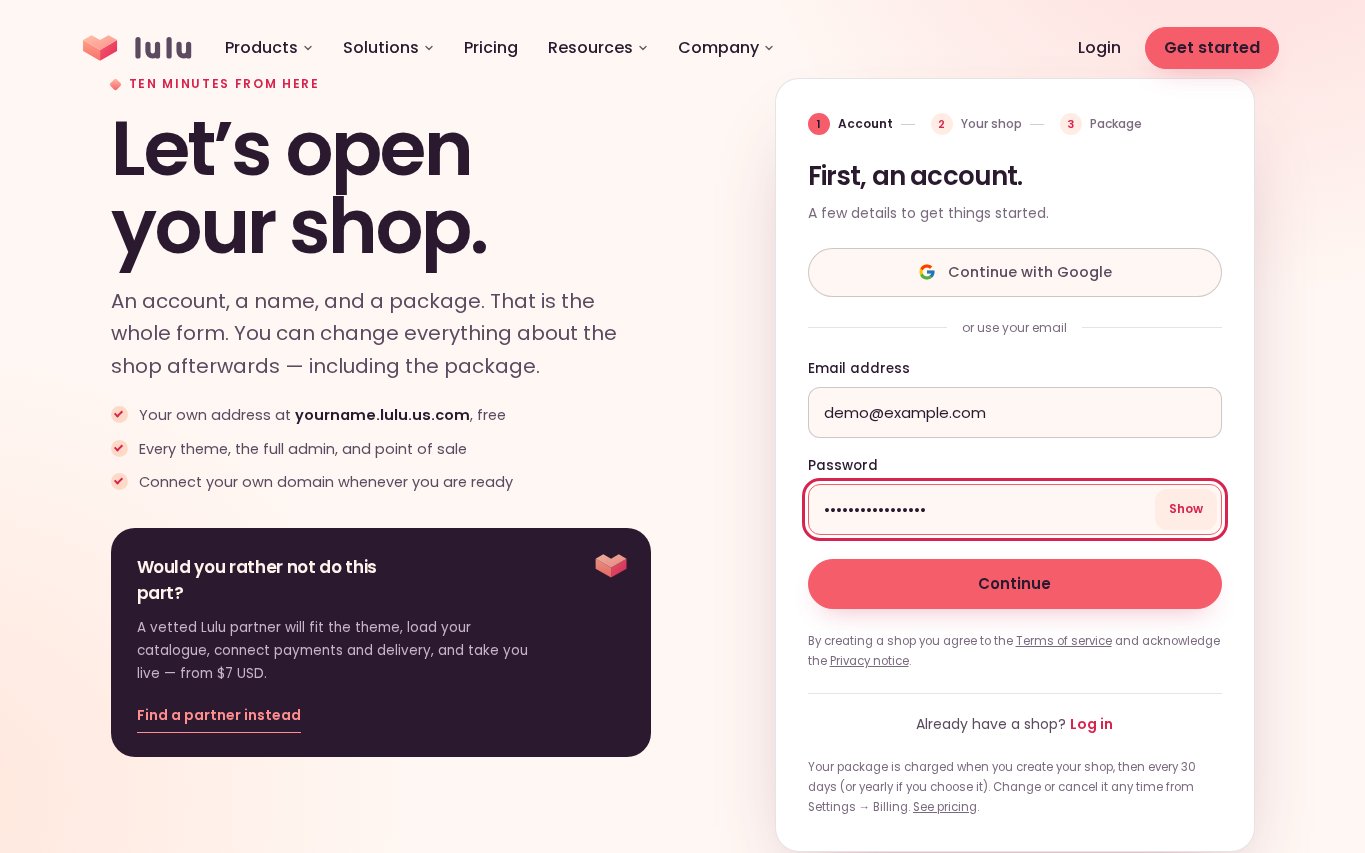
Go to lulu.us.com and click "Get started" (or choose a package on the Pricing page). The signup form has three steps shown at the top: 01 Account, 02 Your store and 03 Package. On the first step either click "Continue with Google", or type your Email address and a Password of 8 to 72 characters (click "Show" to check what you typed). Then click "Continue →".
- Use an email address you can open: your welcome email and receipts go there.
- Already have a store? Click "Log in →" at the bottom of the form instead.
Name your store and choose its address
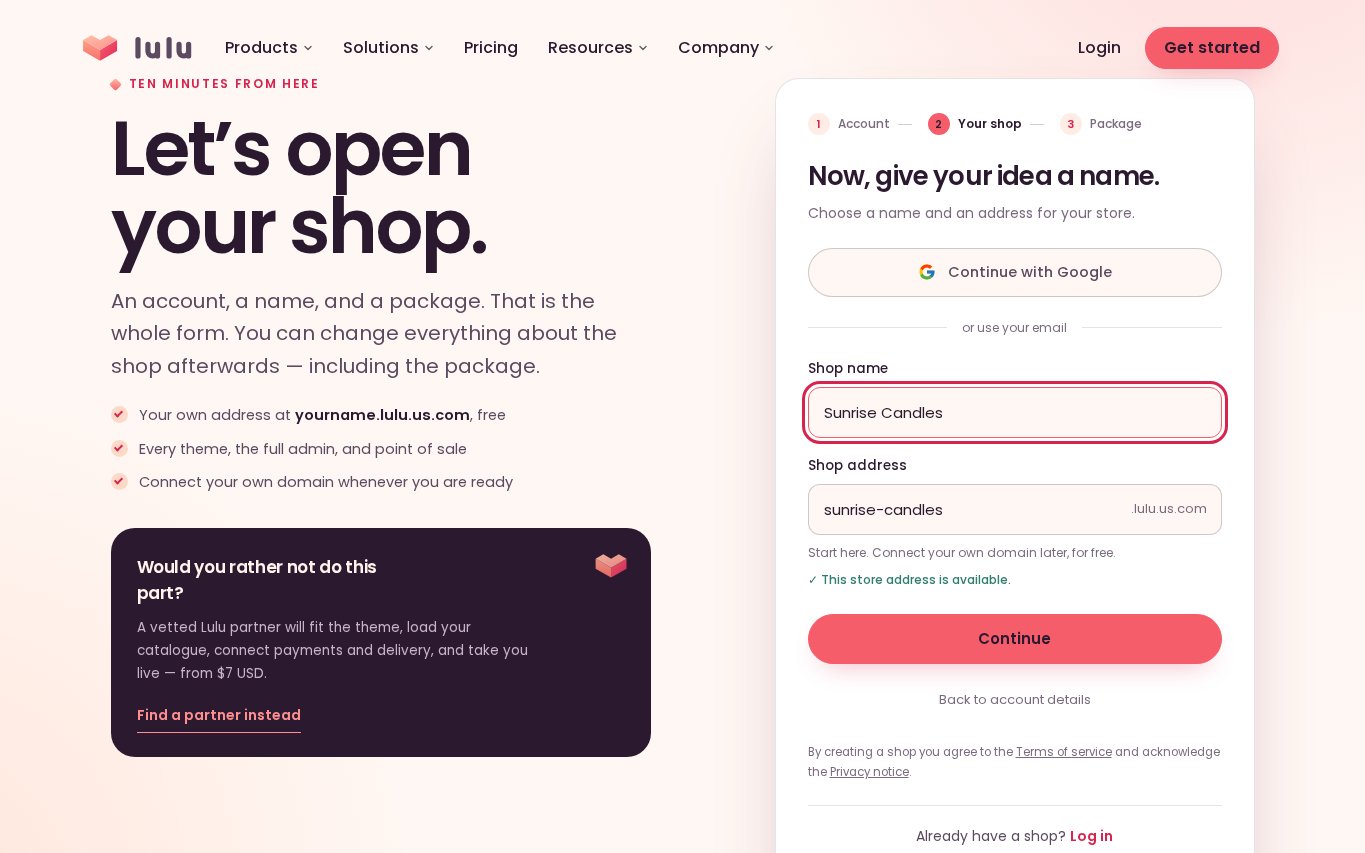
Type your Store name (at least 2 characters). The Store address is filled in for you from the name and ends in .lulu.us.com; you can change it, using 3 to 40 lowercase letters, numbers and hyphens. Wait until the form says "✓ This store address is available.", then click "Continue →". Use "← Back to account details" if you need to change your email.
- The address is only your free web address. You can connect your own domain later under Settings > Domains.
- If it says "This address is unavailable. Try another name.", change a word or add a hyphen.
Choose your package
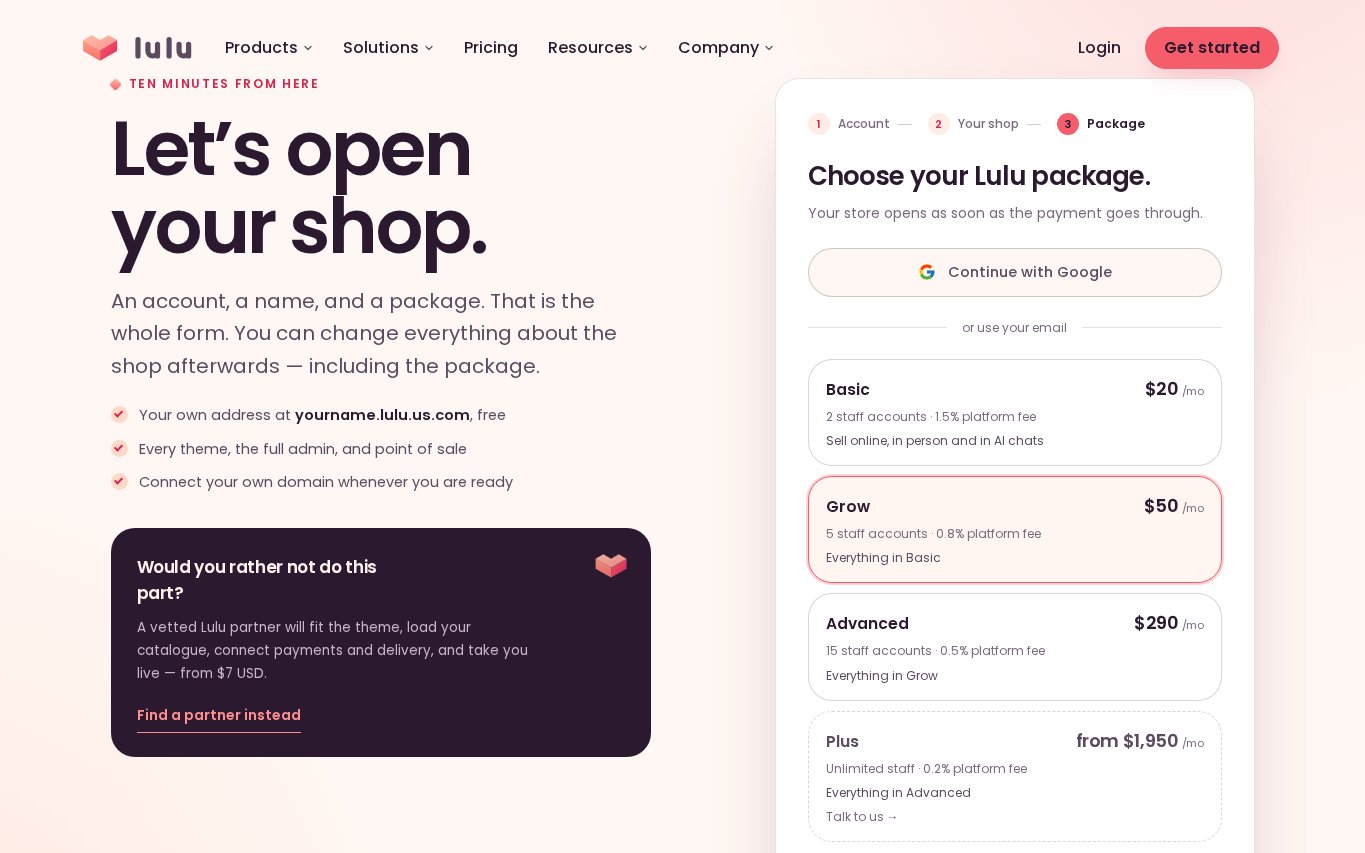
On step 03 Package choose Monthly or Yearly (yearly saves up to 15%), then click the package you want. Each card shows the price, the number of staff accounts and the platform fee: Basic $20/mo (2 staff, 1.5% fee), Grow $50/mo (5 staff, 0.8% fee), Advanced $290/mo (15 staff, 0.5% fee). On Yearly the cards show the monthly equivalent and the total per year (Basic $204, Grow $540, Advanced $3,000). Plus (from $1,950/mo) is arranged with the team: its card says "Talk to us →" and opens the contact form. When a package is selected, click "Continue to payment ↗".
- You can upgrade or downgrade later under Settings > Billing, so pick what fits today.
- The platform fee is a percentage of your sales; your payment provider's own processing fee is separate.
Pay for the first billing cycle
The button changes to "Opening secure payment…" and you are taken to the secure payment page of the platform's card payment provider. It shows the package and the amount for the first cycle. Enter your card details there and confirm. Lulu never sees or stores your card number. When the payment succeeds you come back to the signup page, which shows "Payment received — opening your store…" and then "Your store is ready. Opening…", and your new admin opens.
- If you close the payment page or the payment fails, the form says "Payment not completed" and that nothing was charged. Click "Try payment again". Your email, store name and address are kept; you may be asked to type your password again.
- If your address was taken by someone else while you were paying, you get a close variation and the page tells you the new address.
- No payment means no store: nothing is created until the first cycle is paid.
Check what you receive
Two emails arrive. "Welcome to Lulu — your store name is ready" contains the "Open your admin" button, your store's web address, the storefront password and a shareable preview link. "Your Lulu receipt" confirms the package, the amount, the billing period and the payment reference. Your store starts in development: visitors see a password page until you go live, so you can build in private.
- Keep the receipt; the same bill is listed later under Settings > Billing > Past bills.
- You can see or change the storefront password under Online Store > Preferences.
Sign in to your admin
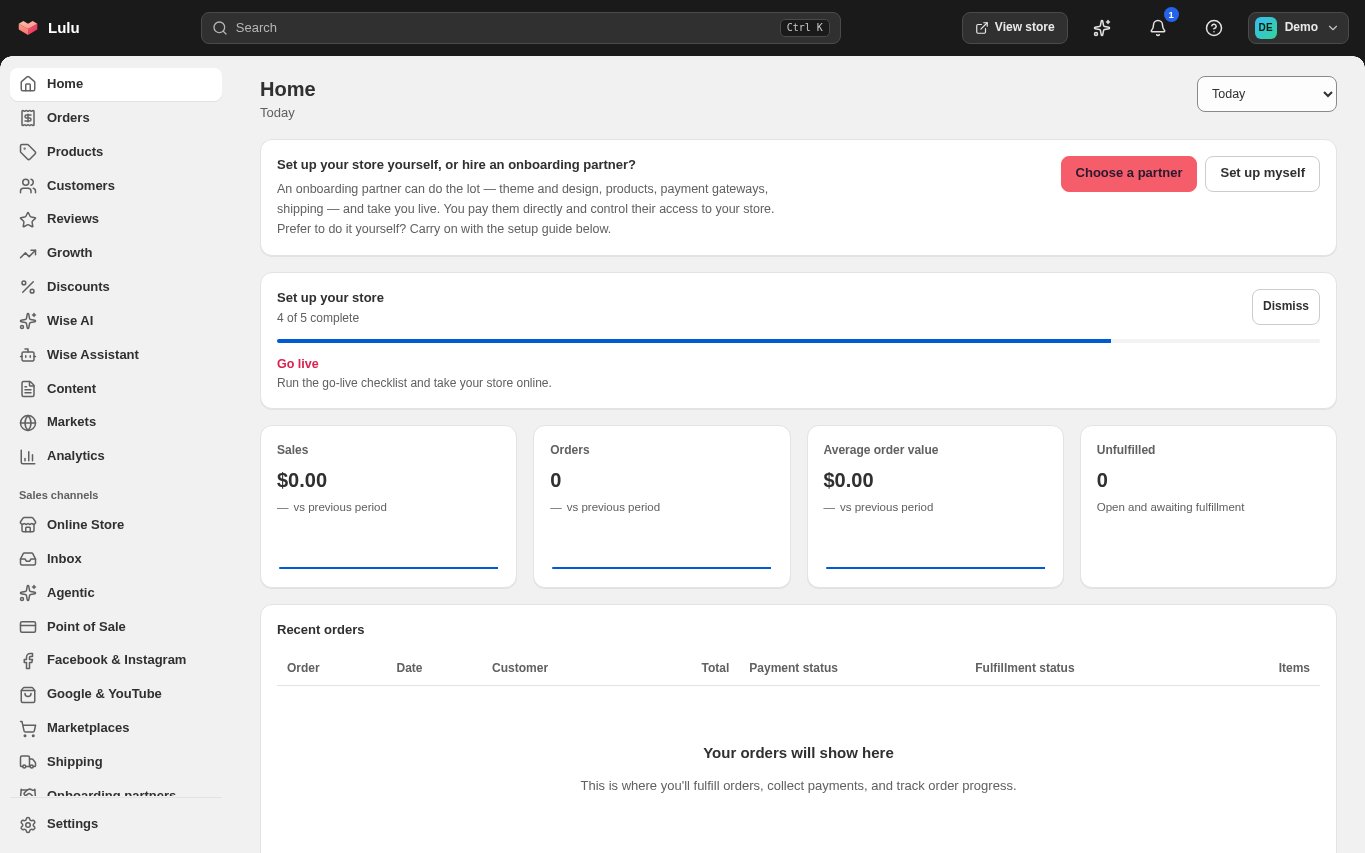
Go to admin.lulu.us.com (or click "Login" on lulu.us.com) and sign in with the email and password you chose, or with Google if you signed up with Google. Every admin page lives under admin.lulu.us.com/store/your-address/ followed by the page, for example admin.lulu.us.com/store/your-address/settings. The Home page shows a "Set up your store" guide that ends with "Go live".
- Bookmark admin.lulu.us.com/store/your-address to come straight back.
- If you manage more than one store, check the store name in Settings before you pay for anything.
Open the App Store
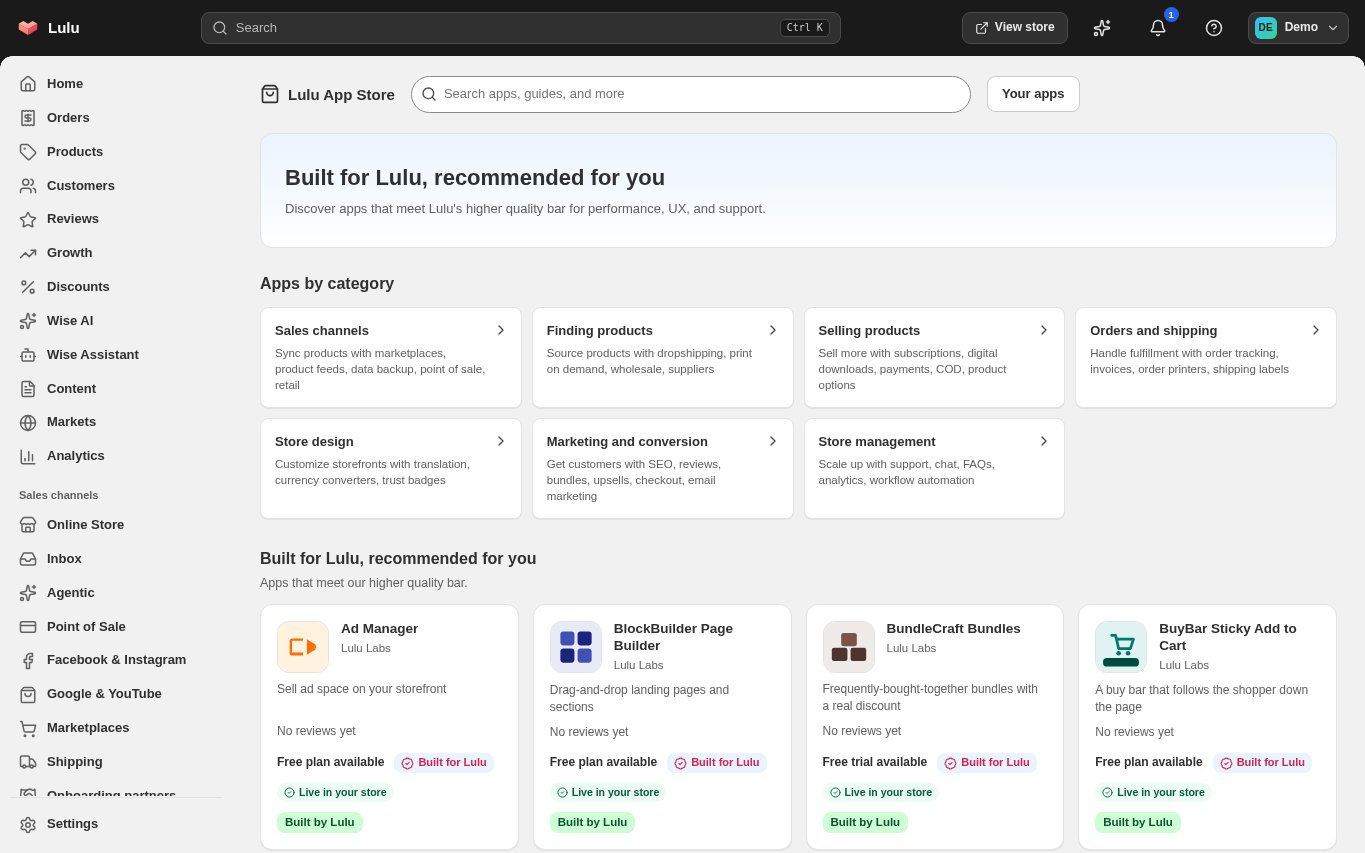
In the sidebar click "Apps", then click "Lulu App Store" at the top right (while no app is installed, the sidebar also shows "+ Add apps"). Search at the top or open a category such as Selling products or Marketing and conversion. Each app card shows its maker, a short description and its price label: "Free plan available", "Free trial available" or "Free to install".
- "Built for Lulu" and "Built by Lulu" mark apps made and supported by Lulu.
- "Your apps" at the top takes you back to the apps you have installed.
Read the app's listing and compare its plans
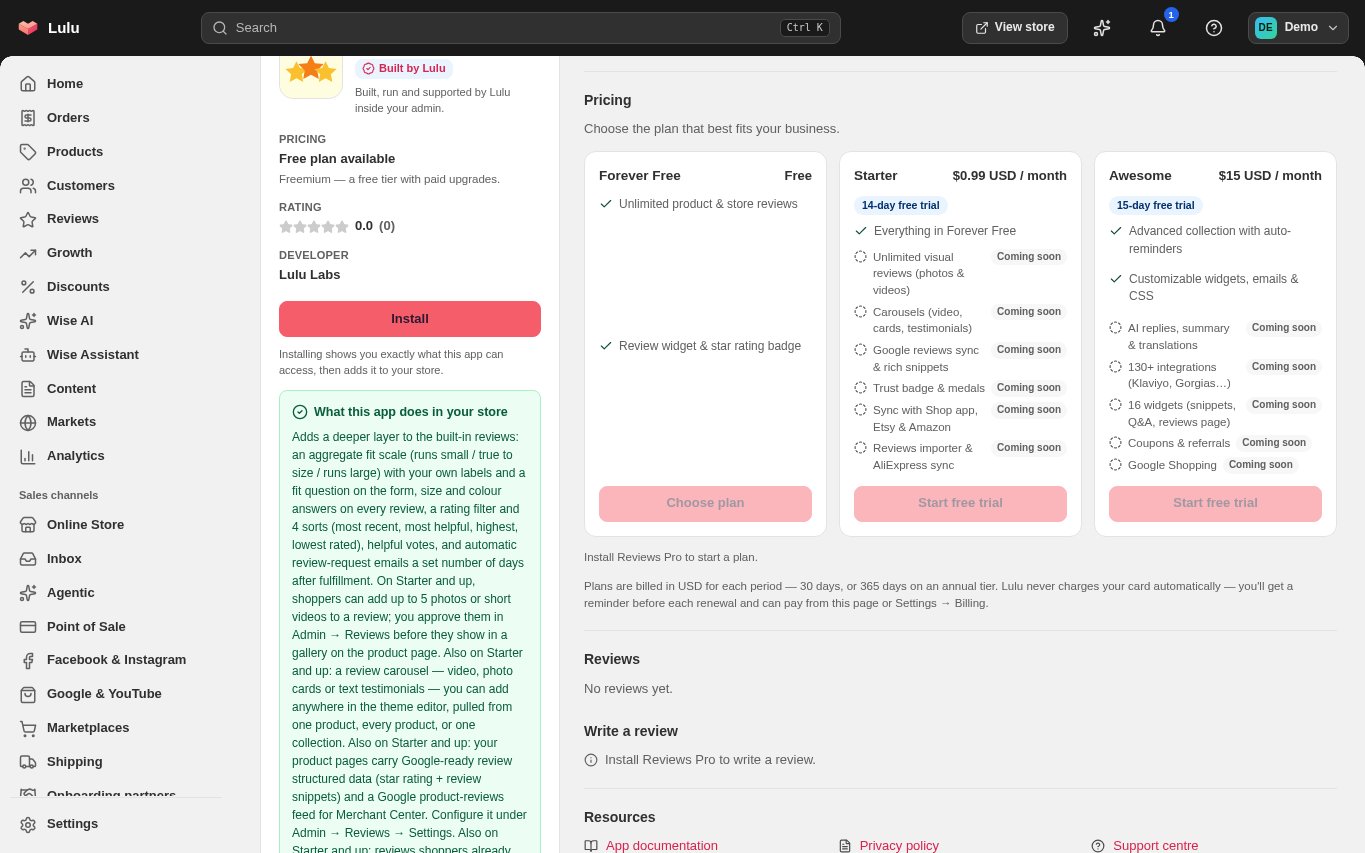
Open an app. The card on the left shows Pricing, Rating and Developer, a badge that says what kind of app it is (for example "Built by Lulu" or "Built-in feature") and the "Install" button. Scroll to Pricing to compare the plans: each plan card shows its USD price per month, its free-trial length (for example "14-day free trial") and its features. Features marked "Coming soon" are not available yet, so do not pay for a plan because of them. Read "What this app does in your store" to see exactly what you get.
- App plans are billed in USD for each period: 30 days, or 365 days on an annual plan.
- If an app is made by another company, the listing says that company may bill you separately for its own service.
Install the app and check what it can access
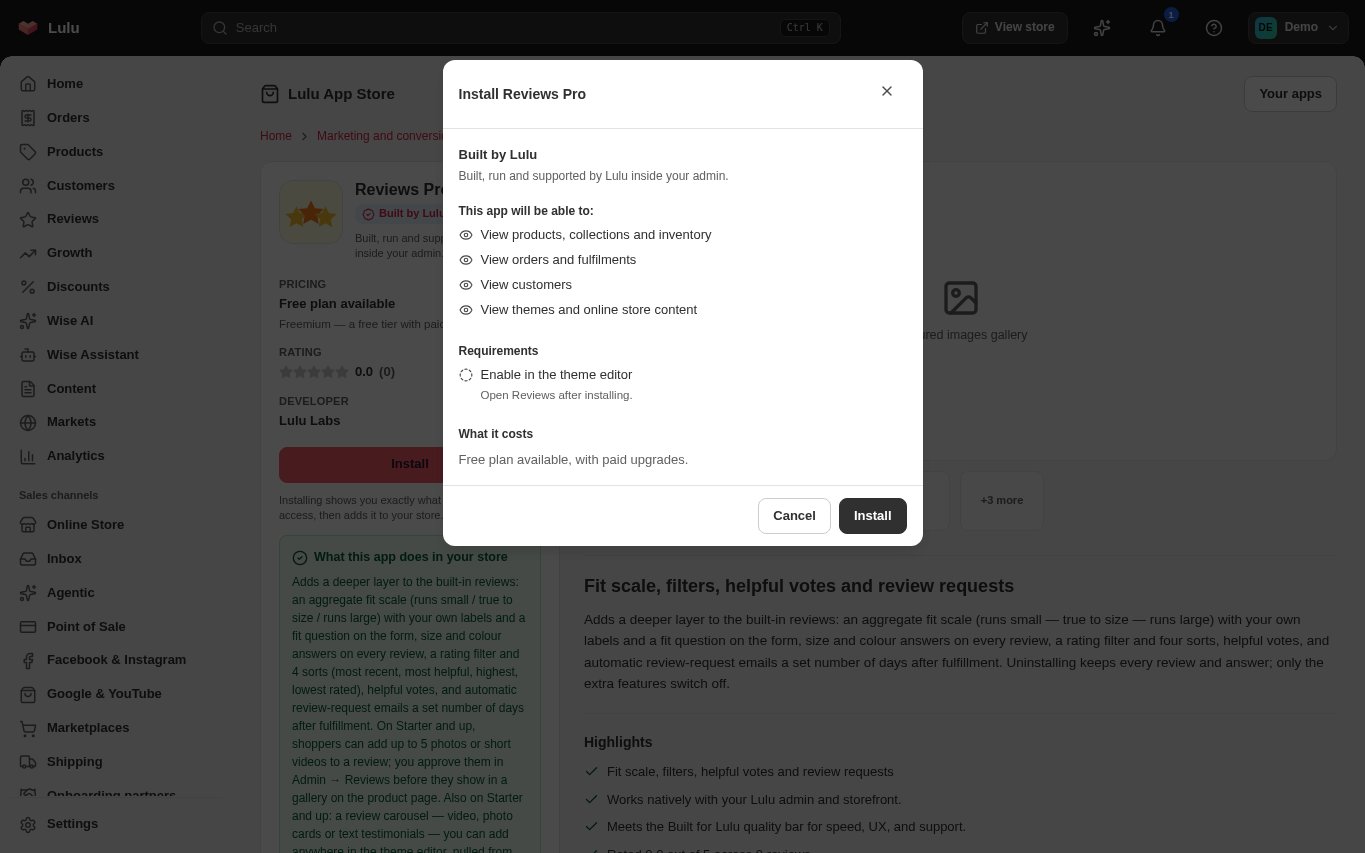
Click "Install". Nothing is added yet: a confirmation titled "Install" plus the app's name opens first. Under "This app will be able to:" it lists the store data the app can view or edit (or says it does not request access), under "Requirements" what you need to do or connect, and under "What it costs" the price and any trial. Click "Install" to add the app, or "Cancel" to leave without changes.
- After installing, the listing shows "Installed" with "Open app" and "Uninstall", and the app appears under Apps in the sidebar.
- Some apps also need to be switched on in the theme editor (Online Store > Customize); the Requirements list tells you.
Choose an app plan: free, free trial or development stores only
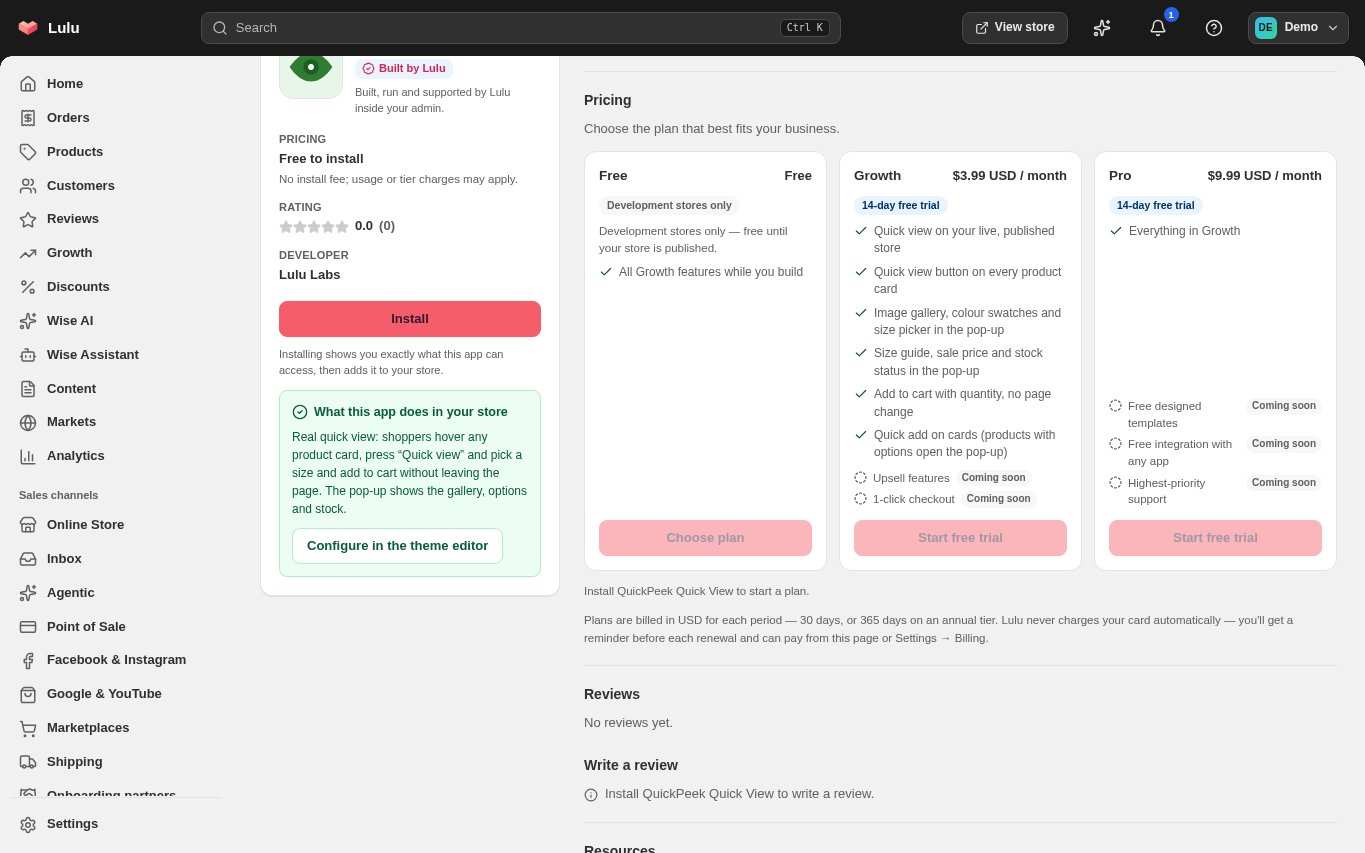
On the installed app's listing, go to Pricing and use the button on the plan you want. "Choose plan" picks a free plan straight away, or opens payment for a paid plan. "Start free trial" starts a paid plan free for the days shown, without a card; you get a trial only the first time you choose a paid plan of that app. A free plan marked "Development stores only" is free only while your store is still in development (before you go live); once your store is live the card says "Your store is live, so this free plan is no longer available. Choose a paid plan." The plan you are on is marked "Current plan", and a banner above the plans shows its status, for example "Active" with the renewal date or "Trialing until" a date.
- A paid plan starts the app's normal free trial (usually 14 days), then you pay for it. This happens whether or not your store is live.
- An app labelled "Free plan available" has a free plan you can keep after going live.
- An app labelled "Free to install" usually has a development-only free plan: budget for a paid plan when you launch.
Pay for an app plan
App plans are never charged to your card automatically. When a trial is running or a payment is due, the banner and the current plan show "Pay now" with the amount; after paying, the same button reads "Renew now" so you can pay the next period early. Click it and pay in the secure payment window. When it finishes you see "Payment received — your plan is active". If you close the window first you see "Payment window closed — your plan is unchanged until the payment completes." You get reminder emails before a trial or period ends.
- If a period ends unpaid, the plan shows "Past due" and the app is paused ("Suspended") 3 days later until you pay. Your settings are kept.
- If an app's payment is due when you go live, the Go live page (Home > Go live) lists it under "Paid apps" with "Total due" and a "Pay … for apps" button, charged one app at a time. An app whose free trial is still running is not charged when you go live: it bills when the trial ends.
Find your apps afterwards
Click "Apps" in the sidebar. The Installed tab lists each app with its Developer, Pricing, Plan (status and renewal date) and Status, with "Open", "Manage plan" and "Uninstall". "Open" goes to the app's own pages, "Manage plan" to its plan cards. Paid app plans are also listed under Settings > Billing > App subscriptions.
- To stop paying for an app, open its listing and click "Cancel plan" under Pricing: you keep access until the end of the period you paid for, then the app is paused.
- "Uninstall" removes the app from your store; check the listing for what happens to its data.
Find a theme in the Theme Store
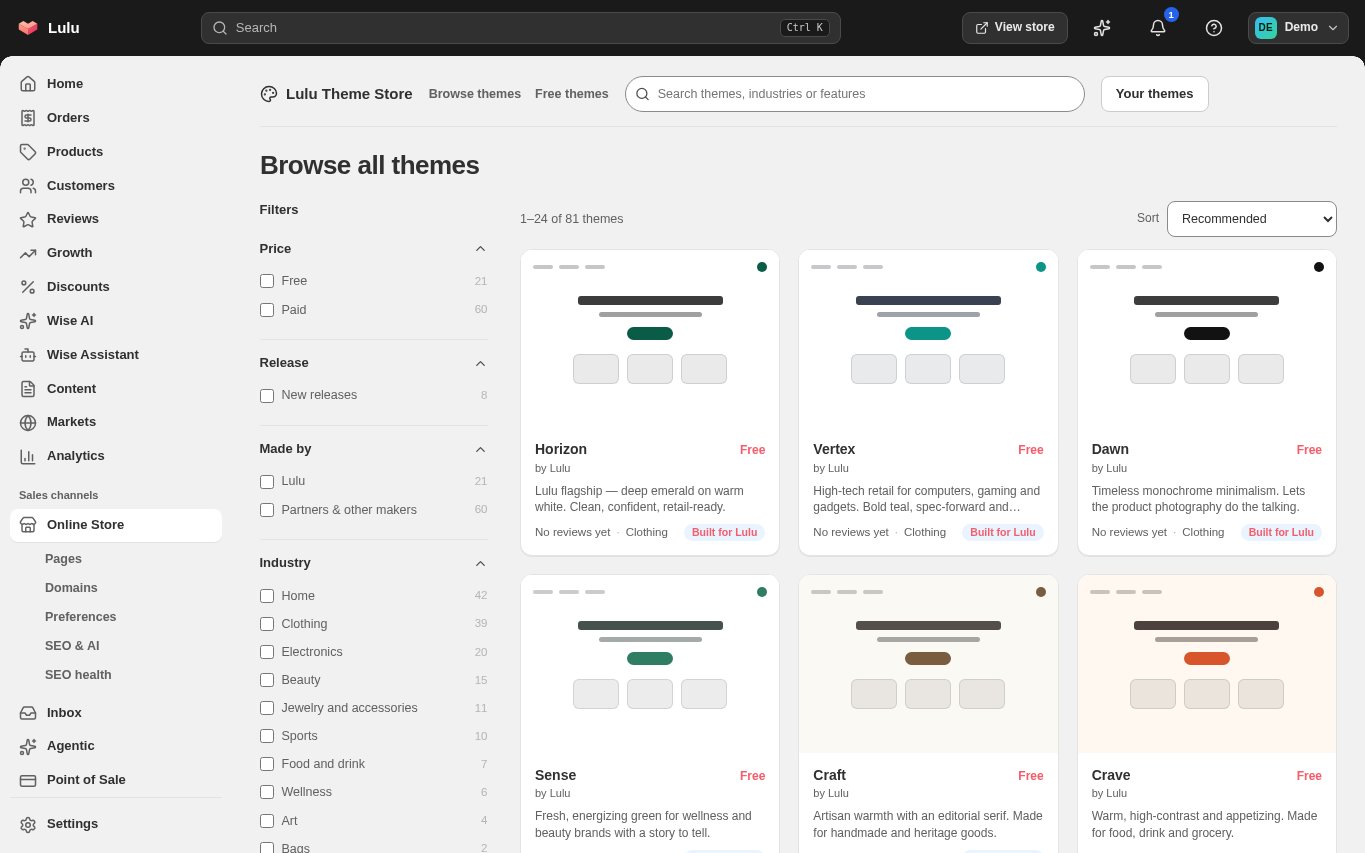
In the sidebar click "Online Store". Next to "Draft themes" click "Browse themes" to open the Theme Store inside your admin (or "Visit Theme Store" for the public Theme Store site). Filter by Price (Free or Paid), Release, Made by, Industry, Style and Features, and use Sort to order by price or name. Each card shows the theme name, its maker and its price or "Free".
- Free themes made by Lulu are marked "Built for Lulu".
- "Your themes" at the top returns to Online Store.
Preview a theme with your own store
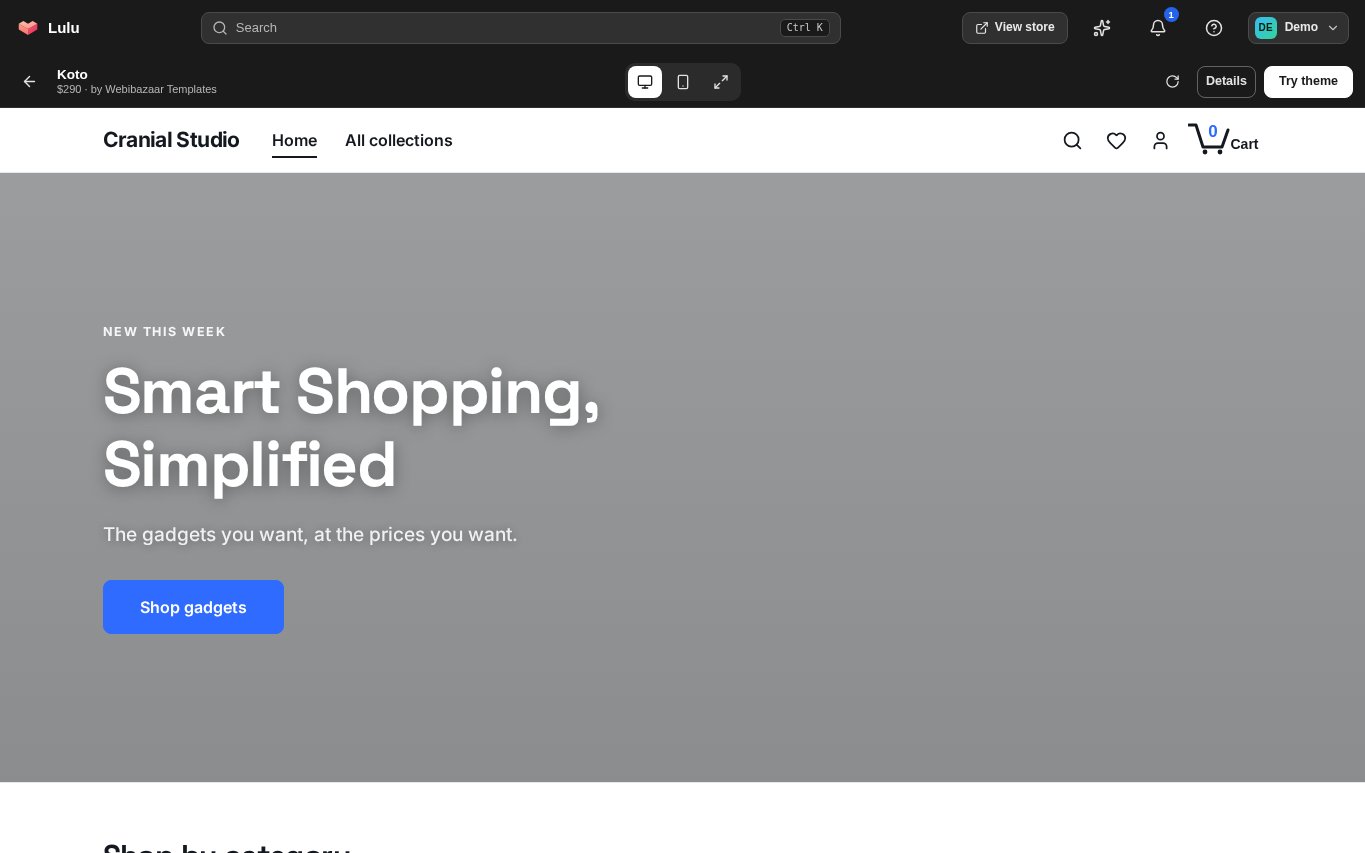
On a theme card or a theme's page click "View demo". The theme opens full screen using your store's name. Switch between desktop and mobile with the buttons at the top, or expand the preview. Click "Details" to go back to the theme's page, or "Try theme" to add it to your themes as a draft. Trying a theme is always free, including premium themes.
Buy a premium theme
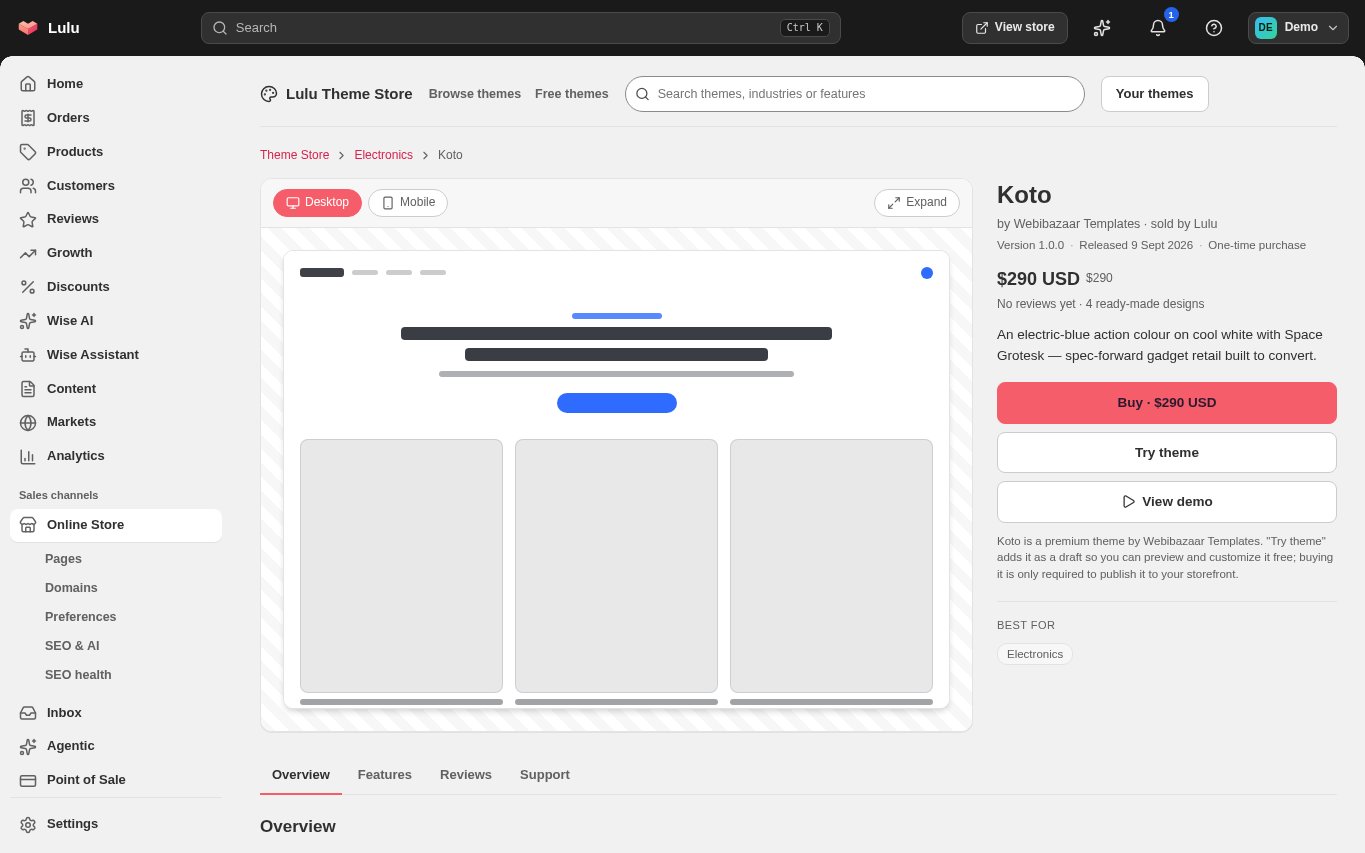
A premium theme's page shows "One-time purchase", the price in USD and three buttons: "Buy" with the price, "Try theme" and "View demo". Click "Buy" and pay in the secure payment window. You pay once and get lifetime use of the theme on this store, with no renewal. After buying, the page shows "Owned". You can also try and customise a premium theme first and buy it only when you publish it.
- Each store buys its own copy: a theme bought for one store is not owned by your other stores.
- The page also shows who made the theme and that Lulu sells it and handles the invoice.
Customise and publish the theme
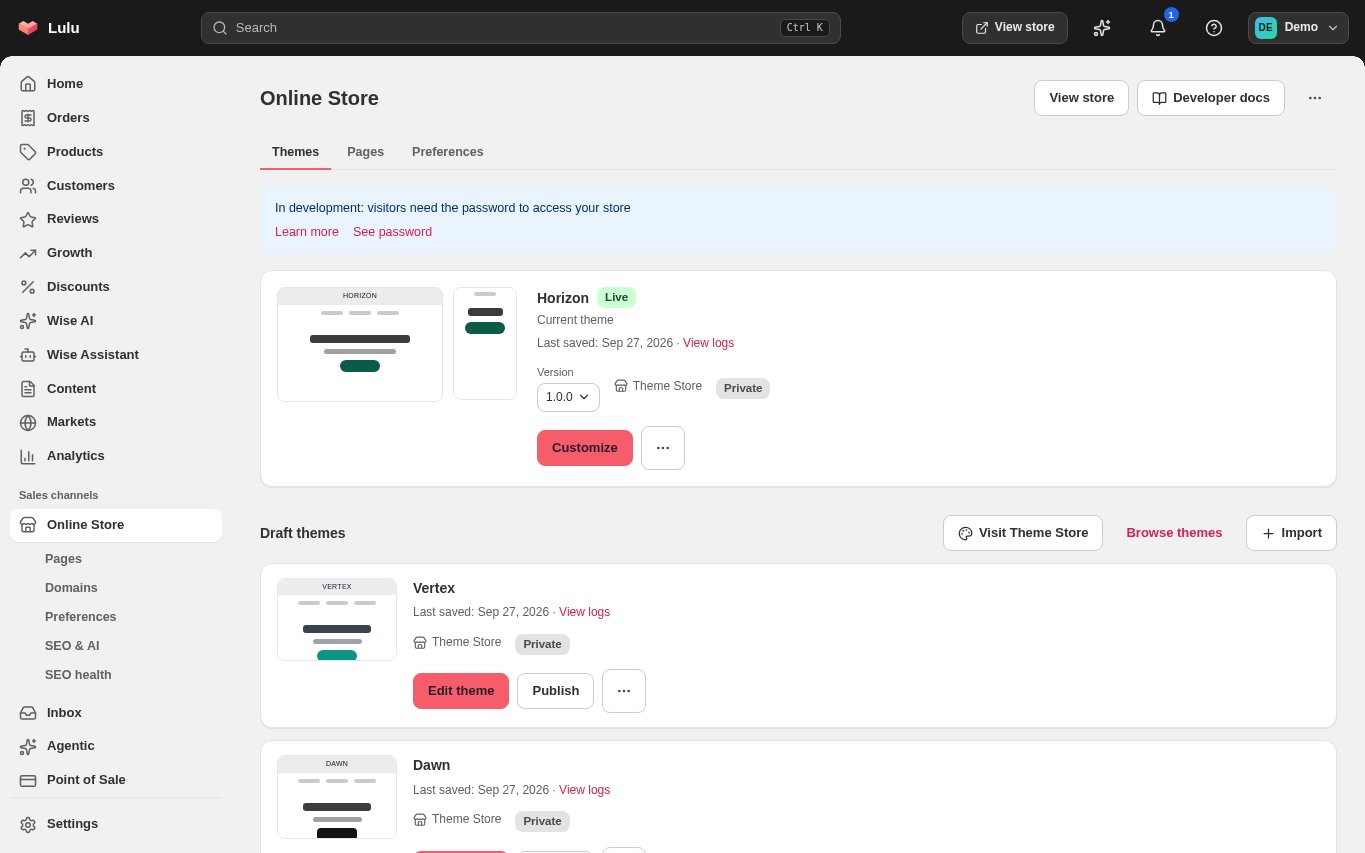
Back in Online Store, the theme you tried is listed under "Draft themes". Click "Edit theme" to change it without affecting your live store. When it is ready click "Publish" and confirm. A premium theme you have not bought shows "Buy to publish" with the price instead: click it to buy and publish in one go. The published theme moves to the top as "Live" and the previous theme moves to your drafts, so you can switch back at any time.
- While the banner says "In development: visitors need the password to access your store", only people with the password see your store. Use Home > Go live when you are ready to open it.
- Until you buy a premium theme, you can customise and preview it, but you can't edit its code: custom.js and head-snippets.html under Edit code are read-only, and GitHub sync is off. Custom CSS still works. Buy the theme to edit its code and to publish it.
- Your online store can hold up to 20 themes; delete drafts you no longer need.
See every charge and receipt in Settings > Billing
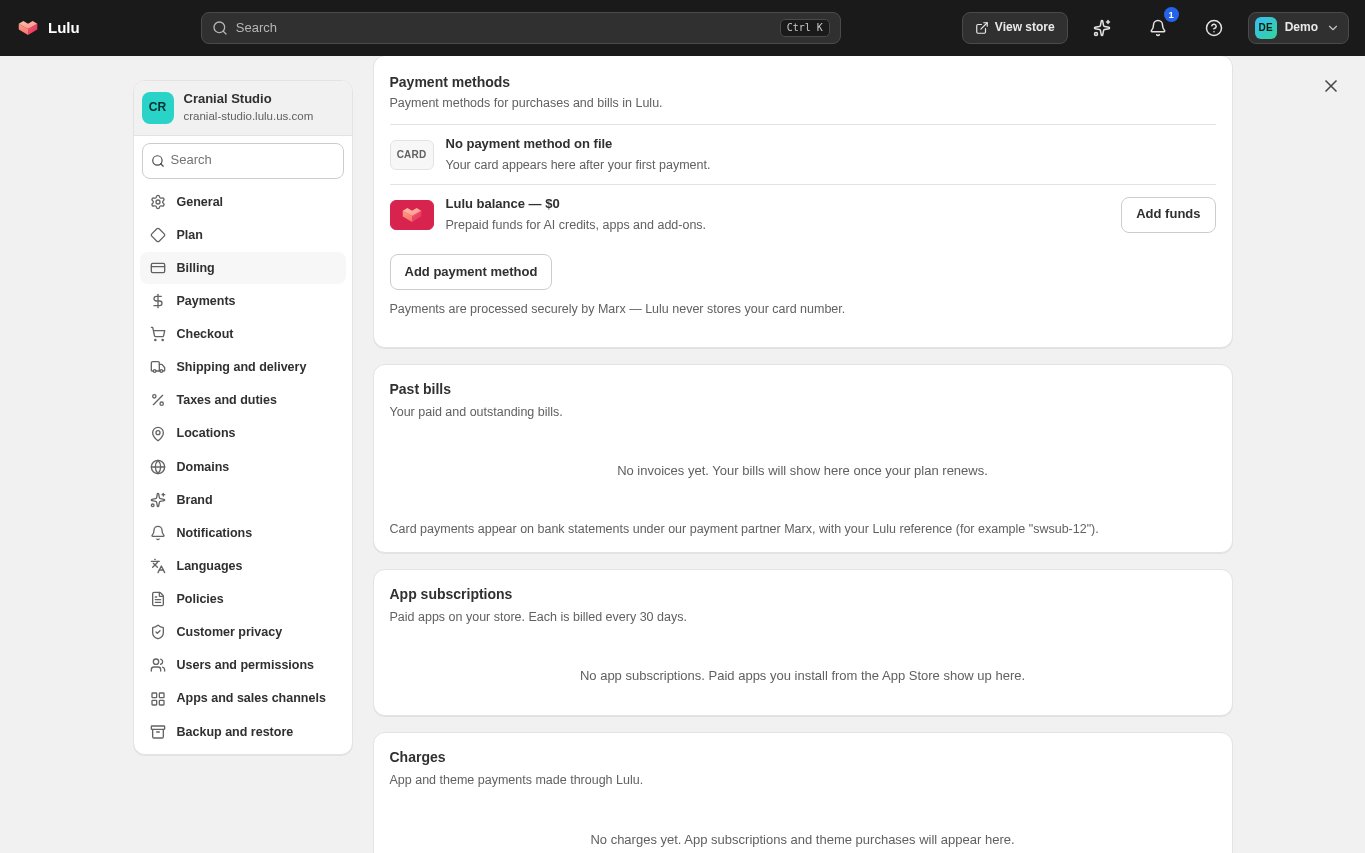
Click "Settings" at the bottom of the sidebar, then "Billing". Your package, your apps and your themes are billed separately and each has its own list: "Past bills" holds your package bills (first payment, renewals, upgrades), each with "Download"; "App subscriptions" lists every paid app with its plan, status, renewal date and "Manage plan"; "Charges" lists every app and theme payment with its date, amount and status. The page also shows your current package, Usage, "Current billing cycle" with the upcoming bill, and "Payment methods".
- A charge marked "Pending" has a "Check status" button; use it before paying again.
- Card payments appear on your bank statement under the platform's payment partner, with your Lulu reference.
Change or cancel your package, apps and themes
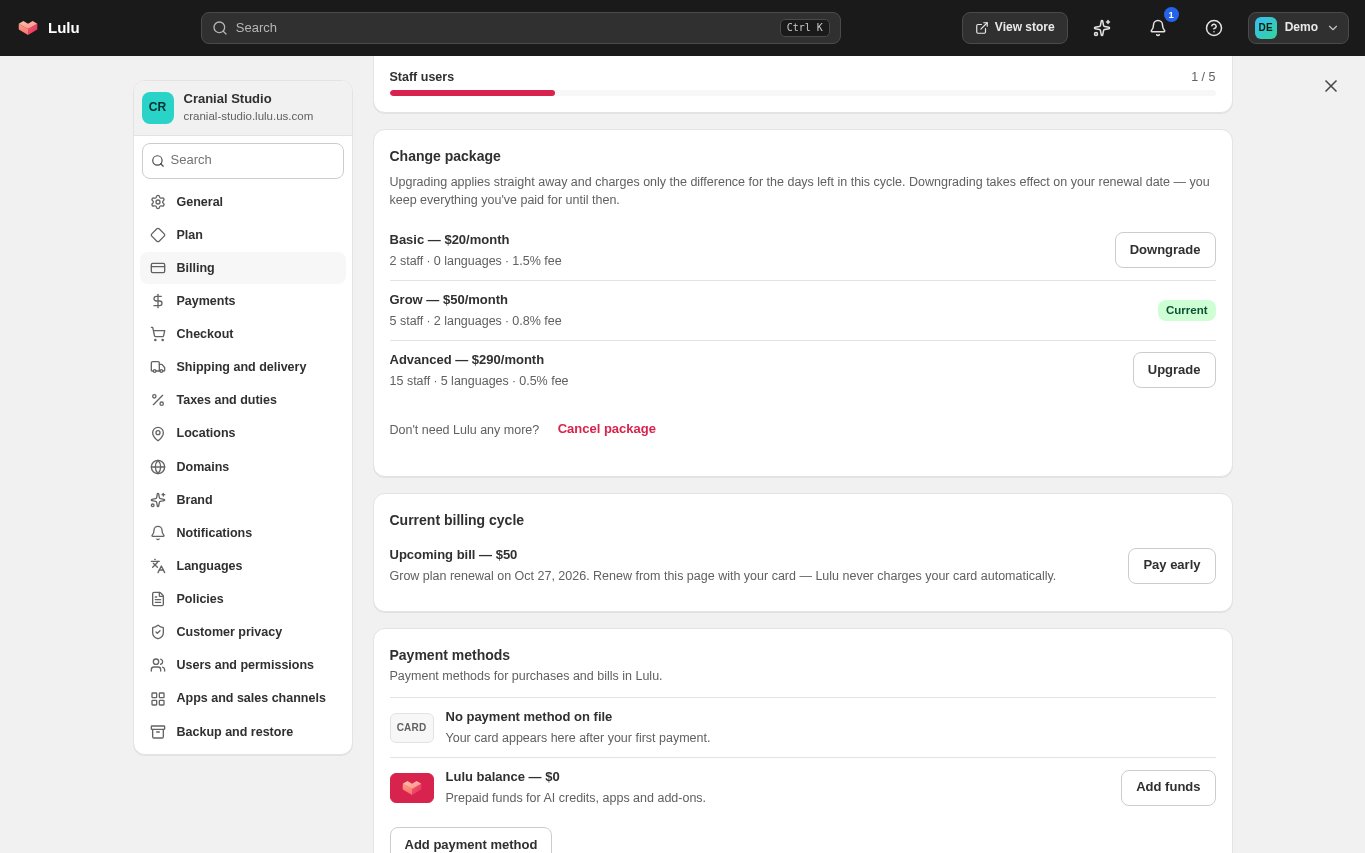
Under "Change package" click "Upgrade" or "Downgrade" next to another package. Upgrading applies straight away and charges only the difference for the days left in the cycle; downgrading takes effect on your renewal date. "Current billing cycle" shows the upcoming bill, and "Pay early" lets you pay it now. To stop using Lulu click "Cancel package": the confirmation explains that your package runs until the renewal date, the storefront then closes, you are not charged again (no refund for the rest of the cycle) and nothing is deleted for at least 90 days. Confirm with "Cancel at the end of the cycle", or keep it with "Keep my package"; you can undo the cancellation before that date.
- A package paid by card at signup is a card subscription that renews every 30 days (or every year) until you cancel it. When the Billing page shows your subscription, "Manage payment method or cancel" changes the card or cancels it.
- App plans are cancelled on each app's listing with "Cancel plan"; premium themes are one-time purchases and never renew.
CHECK YOUR WORK
You’re ready when…
- You received the welcome email and the receipt for your first package payment.
- You can sign in at admin.lulu.us.com and your admin address is admin.lulu.us.com/store/your-address.
- Every app you installed appears under Apps with the plan you expect; paid plans show a renewal or trial end date.
- Apps with "Development stores only" free plans have a paid plan chosen before you go live.
- The theme you want is marked Live under Online Store; any premium theme shows "Owned".
- Settings > Billing lists your package bill under Past bills, your paid apps under App subscriptions and your app and theme payments under Charges.
IF SOMETHING DOESN’T LOOK RIGHT
Troubleshooting
The payment page closed or failed during signup. Was I charged, and is my store created?
If the signup page says "Payment not completed", nothing was charged and no store was created. Click "Try payment again". If it says "Still confirming your payment", the payment went through and the store opens shortly: check your email before paying again, and contact support with your email address if nothing arrives.
An app's free plan button says "Development stores only".
That free plan is only for stores that are still in development. Your store is live, so choose one of the paid plans; if you have never trialled that app, the paid plan starts with a free trial.
Publish says "Buy to publish" on a draft theme.
The draft is a premium theme you have not bought for this store. Click "Buy to publish" (or "Buy" on the theme's page in the Theme Store), complete the payment, then publish. You can keep customising the draft for free in the meantime.
A payment window says the payment could not start, or a charge stays Pending.
Nothing is switched until a payment completes. Under Settings > Billing > Charges click "Check status" on the pending line before paying again. If a payment window cannot start at all, contact support with your store address and what you were paying for.
I paid, but the package, app plan or theme still shows the old state.
Reload the page after a minute. For app and theme payments use "Check status" under Settings > Billing > Charges. If it still has not changed, send support your store address and the payment reference from your receipt; do not pay a second time.
What should I send support?
Send your store address, the page you were using, the steps you took and the exact message you saw. Include a screenshot with customer details hidden. Never send passwords, full card numbers or security codes.