



Create onboarding packages and get merchants onboarded
For approved onboarding partners and the merchants who hire them: create and order packages, how merchants find you and send a request, working your leads inbox, getting collaborator access to the store, closing the job and collecting reviews.
Download this guide: PDF · Word (.docx)
On this page
- 1. Partner: Add a package
- 2. Partner: Say what is included, how long it takes and what is not
- 3. Partner: Order, edit and archive packages
- 4. Merchant: Find onboarding partners in the public directory
- 5. Merchant: Filter by service, budget, country and language
- 6. Merchant: Compare a partner's packages
- 7. Merchant: Send a request from the partner's page
- 8. Merchant: Request sent
- 9. Merchant: Or hire a partner from your store admin
- 10. Merchant: Send the request from the admin
- 11. Merchant: Follow your requests
- 12. Partner: Open your leads inbox
- 13. Partner: Read the request and the merchant's contact details
- 14. Partner: Reply, set the status and keep private notes
- 15. Partner: Ask for collaborator access to the store
- 16. Merchant: Grant the partner access to your store
- 17. Partner: Do the onboarding work
- 18. Partner: Close the lead
- 19. Merchant: Leave a review
- 20. Partner: Reply to reviews
- 21. Merchant: See reviews on the partner's page
- 22. Partner: Pause new work or unlist your profile
- Completion checklist
- Troubleshooting
This guide continues where "Become an onboarding partner — and how the platform approves you" ends: your partner account is approved and your onboarding profile is published in the directory at partners.lulu.us.com/experts. Steps marked "Partner:" happen in the partner portal at partners.lulu.us.com; steps marked "Merchant:" happen on the public directory or in the merchant's store admin at admin.lulu.us.com. Sending a request is free and commits the merchant to nothing. When on-platform buying is switched on for the merchant's store, they can pay for a fixed-price package or a custom offer you send through Lulu: the payment is held until they accept your delivery, and the platform keeps its commission (see "Sell packages, deliver on time, get paid"). A request gives a partner no access to the store until the merchant grants it. The screenshots use the demonstration partner "Demo Onboarding Studio" and a demonstration merchant.
Partner: Add a package
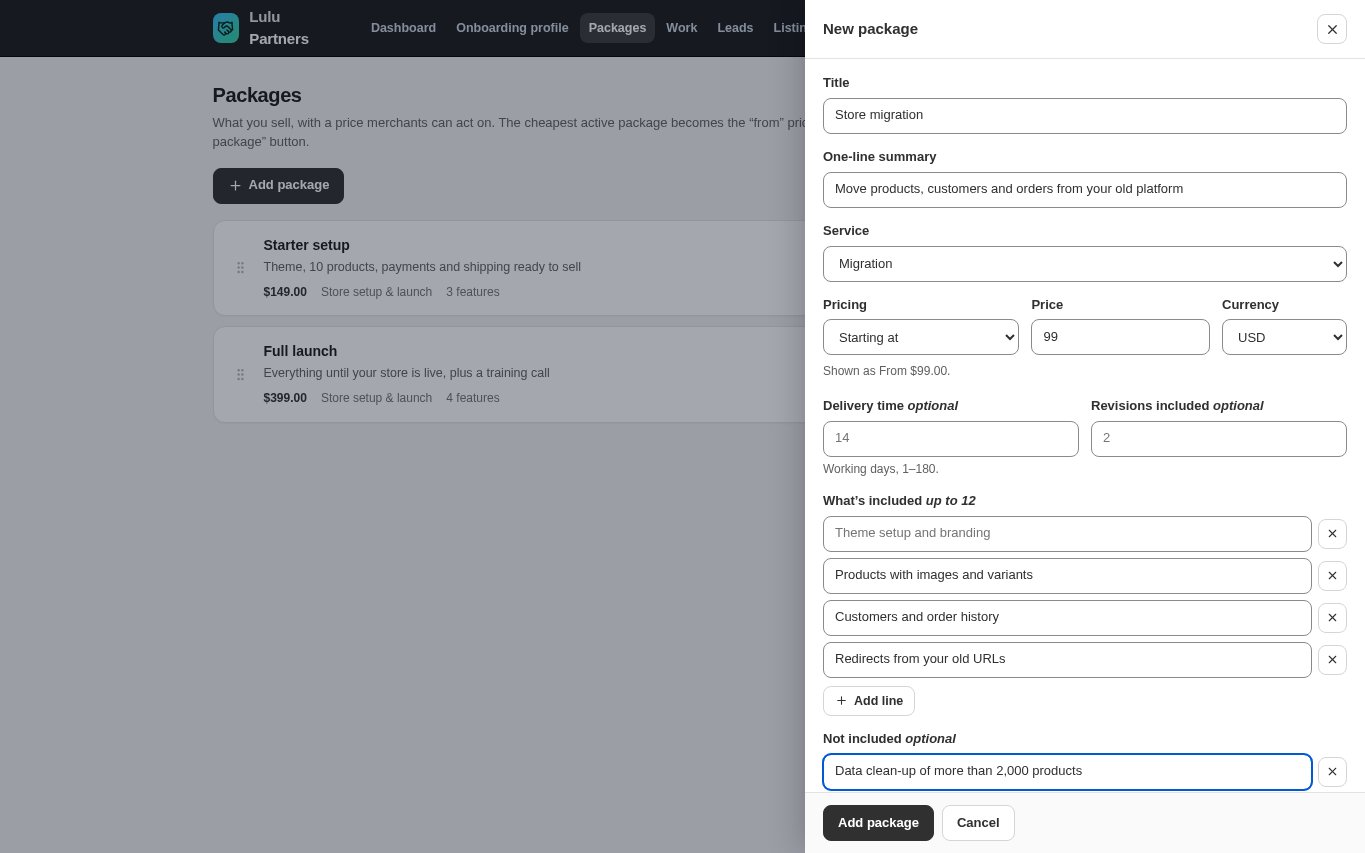
Open "Packages" in the partner portal and click "Add package". Enter a "Title" (3–80 characters) and a "One-line summary", choose the "Service" it belongs to, then set the "Pricing": "Fixed price", "Starting at" (shown as "From …") or "On request" (the card shows "Price on request" and the merchant sends a brief). Enter the "Price" in whole currency units and pick the "Currency"; the line under the fields shows exactly how the price will appear.
- You can have up to 12 active packages.
- The cheapest active package with a price becomes the "From" price on your directory card.
- A package has a minimum price, shown as helper text under the price field. For a free consultation use the "On request" price type.
Partner: Say what is included, how long it takes and what is not
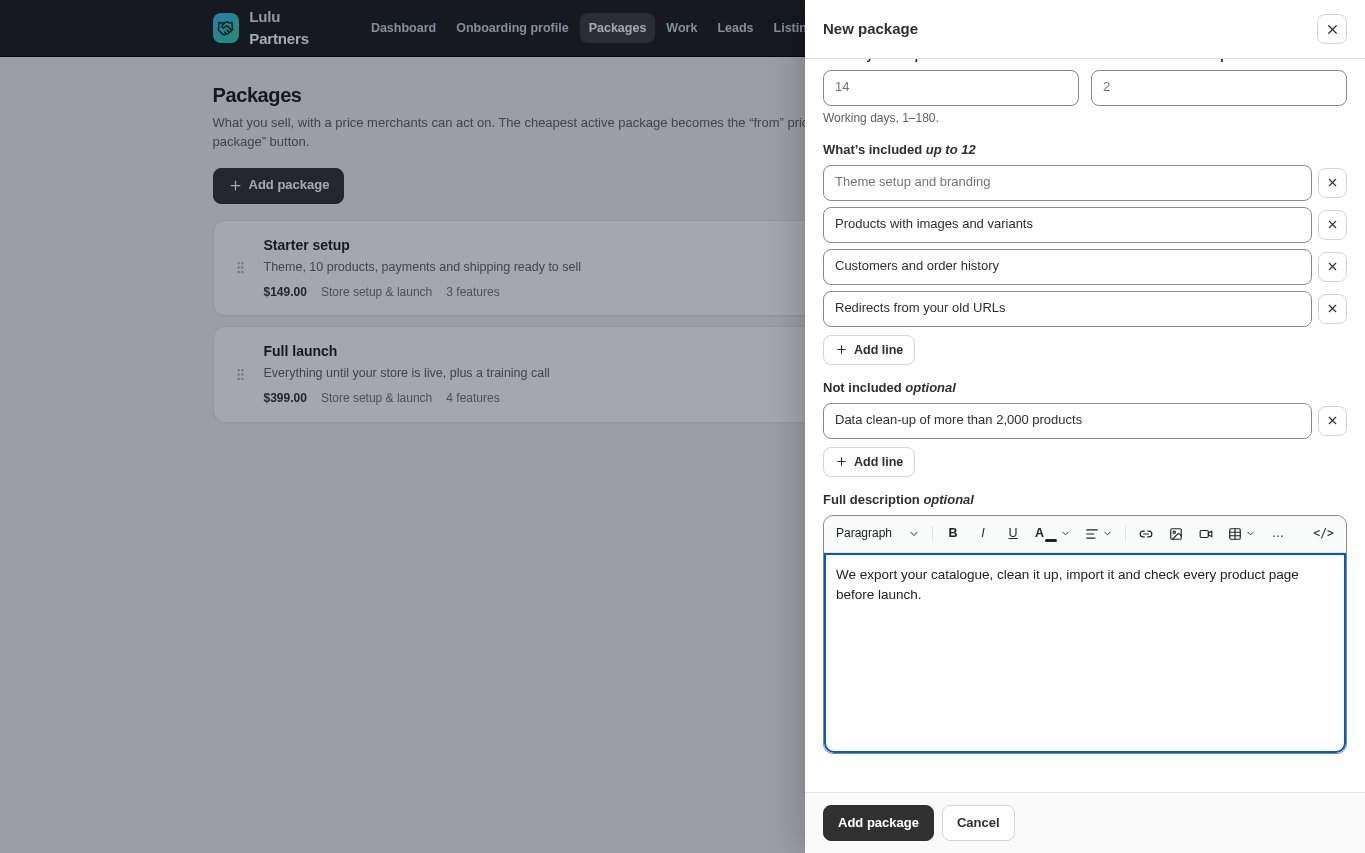
Set the "Delivery time" in working days (1–180) and the number of "Revisions included" (0–20); both are optional. Under "What's included" click "Add line" for each deliverable (up to 12 lines), and use "Not included" to set limits clearly — for example product photography or data clean-up above a certain size. Add a "Full description" if you need more detail, then click "Add package".
- Clear limits prevent disputes: say how many products, pages or revisions a price covers.
Partner: Order, edit and archive packages
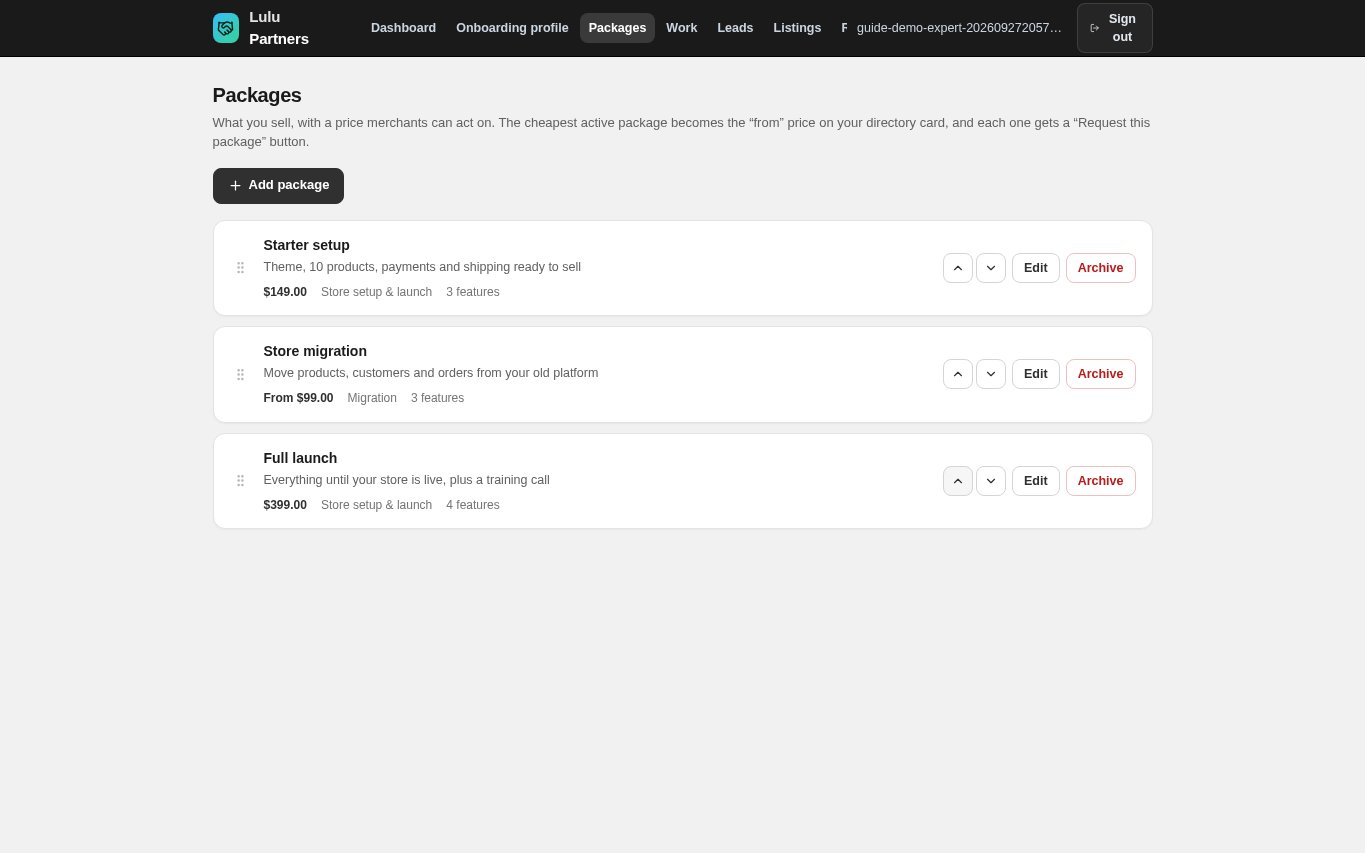
Packages appear on your public page in the order of this list. Drag a package by its handle or use the up and down arrows to move it. Click "Edit" to change a package (changes are live at once and do not need a new review), "Archive" to take it off your page, and "Restore" to bring an archived package back. A package that merchants have already requested is kept as archived so their request still shows it; otherwise archiving removes it.
Merchant: Find onboarding partners in the public directory
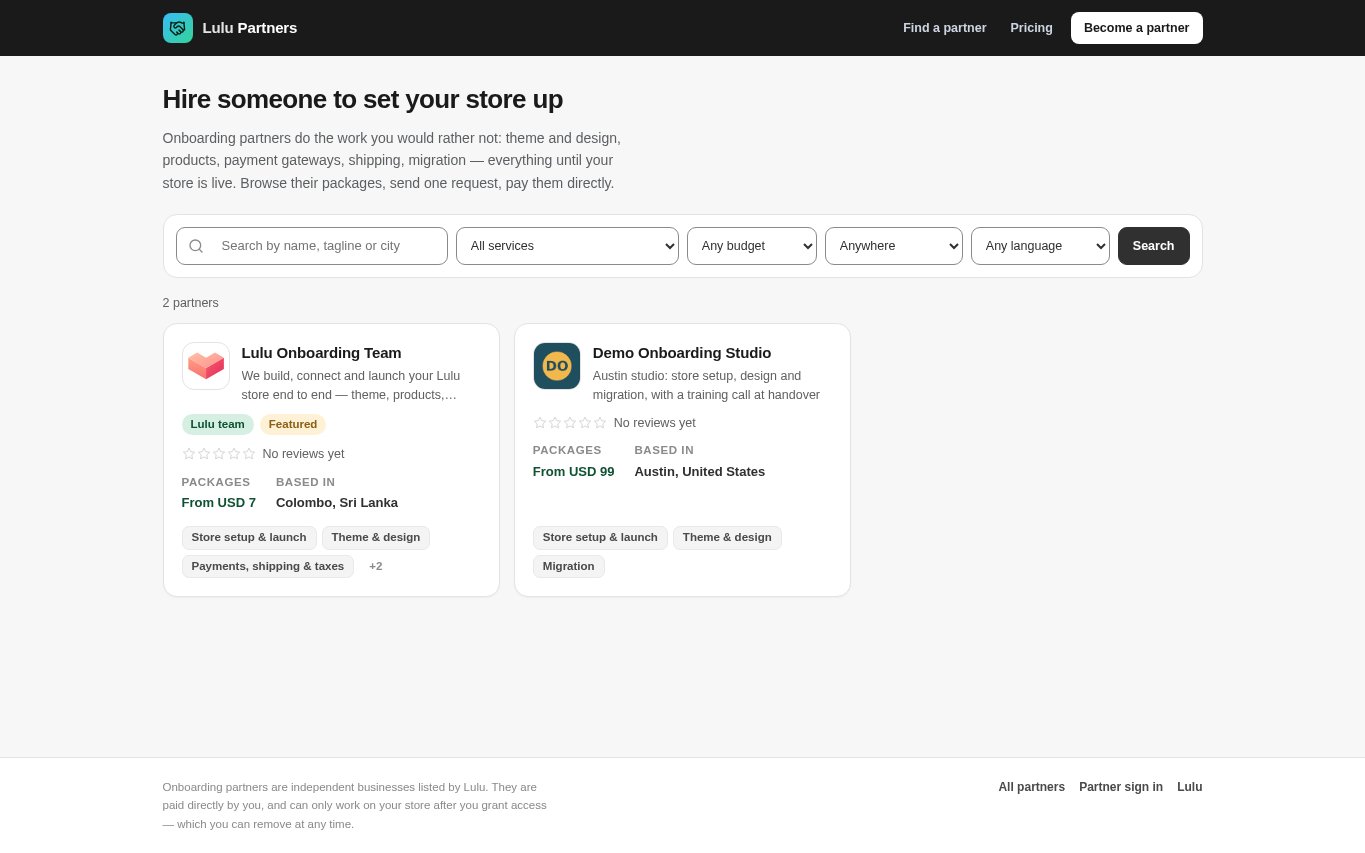
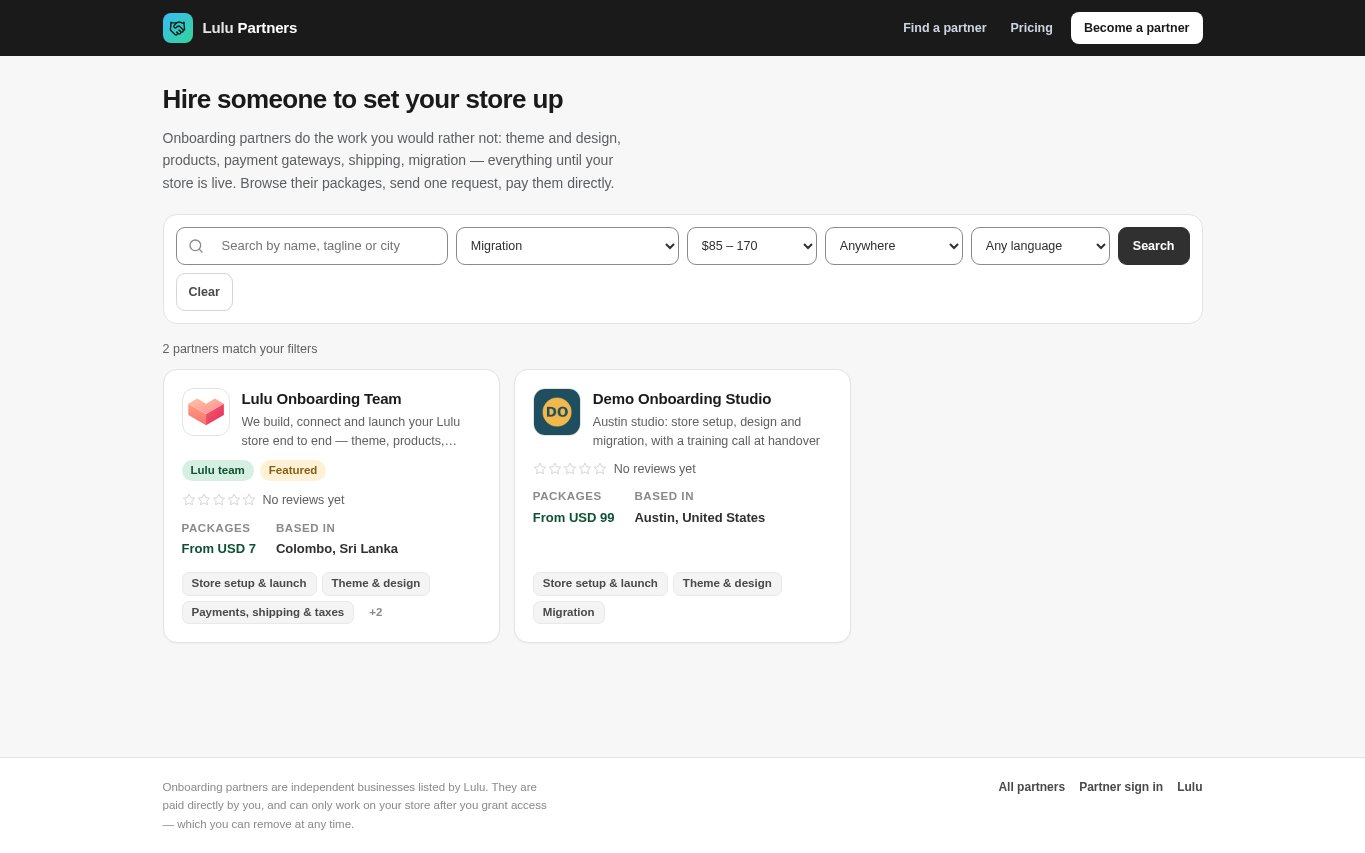
Anyone can browse partners.lulu.us.com/experts ("Hire someone to set your store up"). Each card shows the partner's logo, tagline, badges (such as the Lulu team or Featured), rating, starting price, where they are based and their main services. Click a card to open the partner's page.
Merchant: Filter by service, budget, country and language
Use the search box (name, tagline or city) and the filters "All services", "Any budget", "Anywhere" and "Any language", then click "Search"; "Clear" removes the filters. The budget filter shows partners with at least one package at or below the top of the budget you choose. Budget bands on Lulu: Under LKR 10,000; LKR 10,000 – 25,000; LKR 25,000 – 50,000; LKR 50,000 – 100,000; Over LKR 100,000; Not sure yet.
- Filters are kept in the page address, so a merchant can bookmark or share a shortlist.
Merchant: Compare a partner's packages
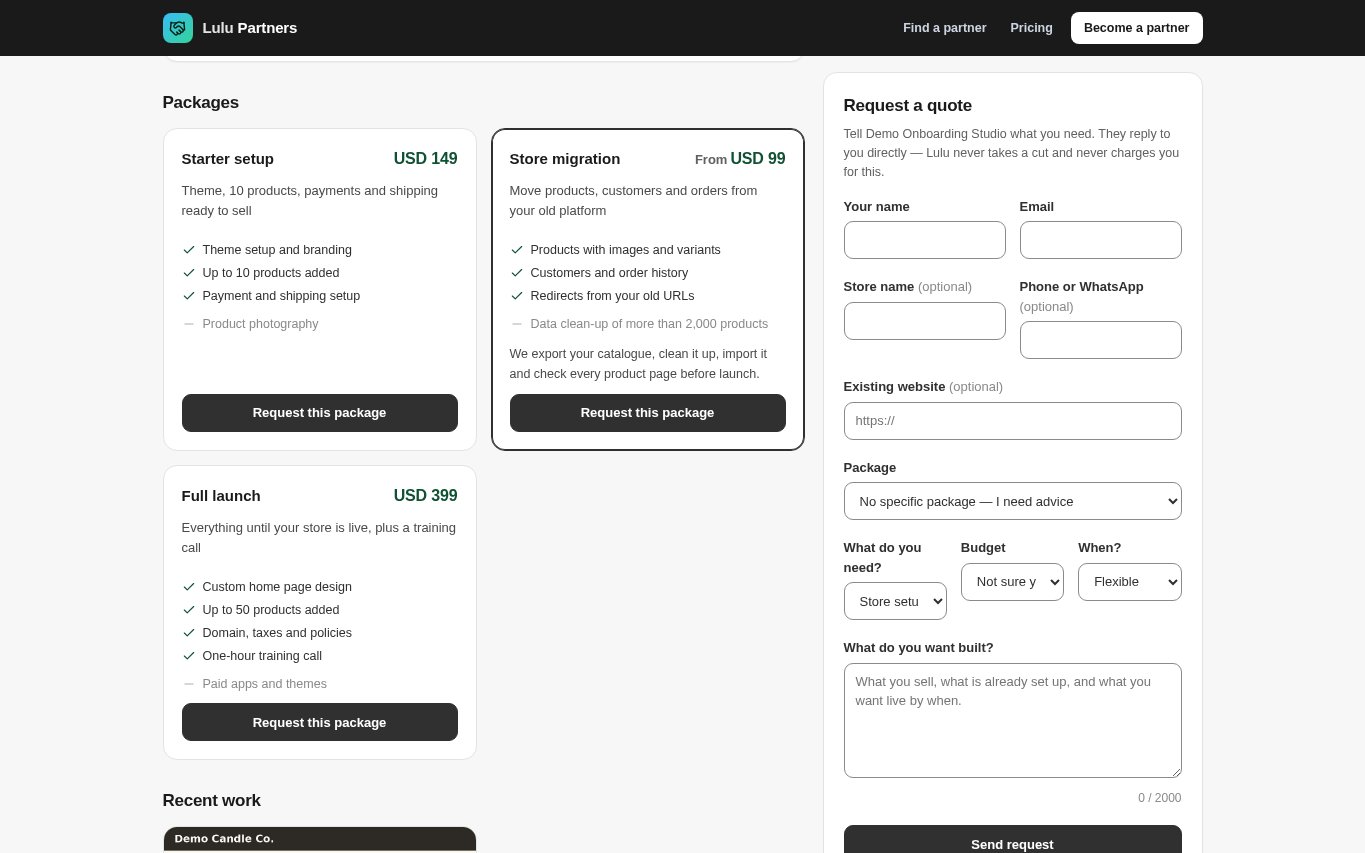
On a partner's page, the "Packages" section shows each package with its price, what is included (tick marks) and what is not (dashes). The cheapest package is highlighted. Each package has one button: "Buy this package" when it has a fixed price and can be bought online, otherwise "Ask for a quote", which pre-selects that package in the request form. "Request a quote" at the top of the page is for general advice.
Merchant: Send a request from the partner's page
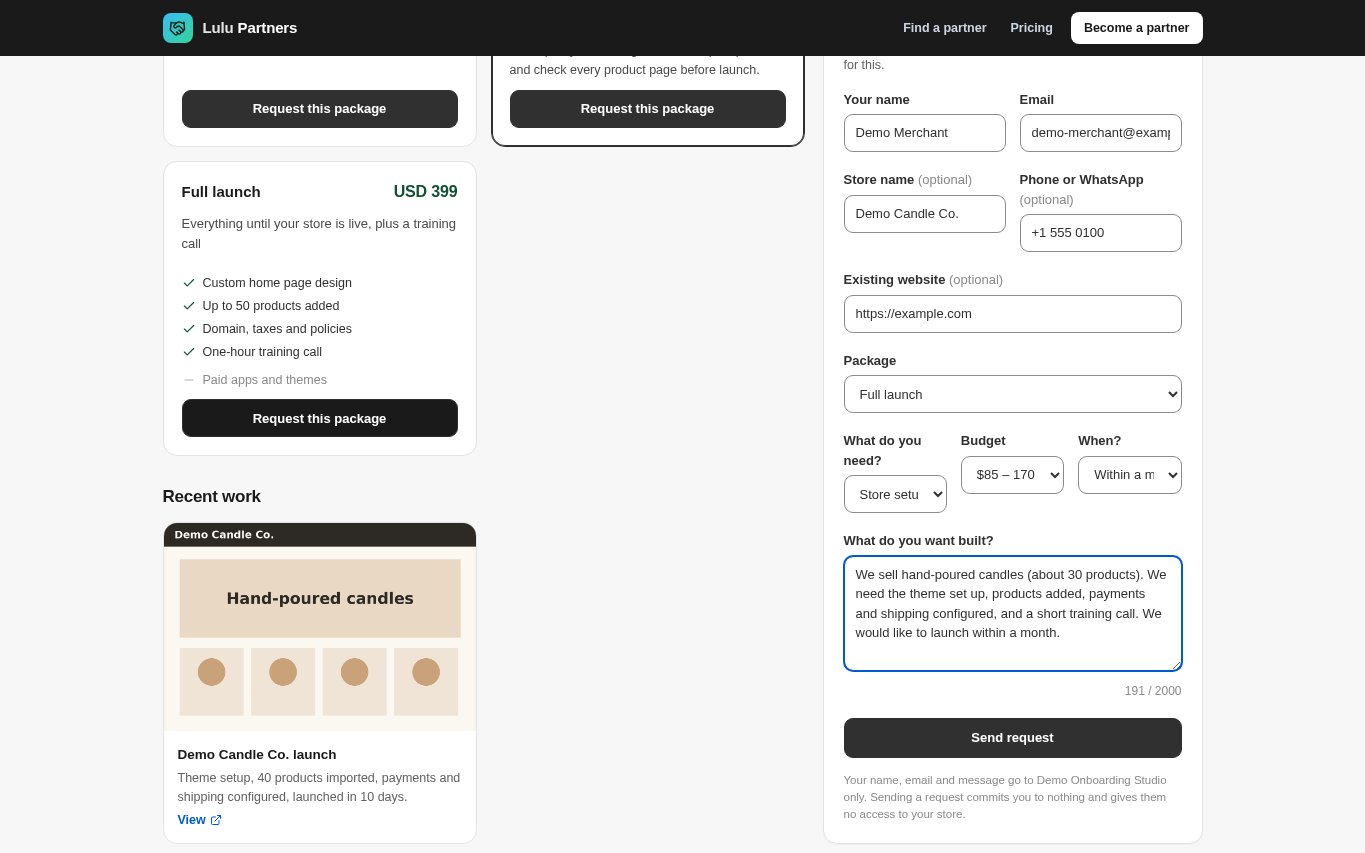
Fill in the "Request a quote" form: "Your name", "Email", optional "Store name", "Phone or WhatsApp" and "Existing website", the "Package" (or "No specific package — I need advice"), "What do you need?", "Budget", "When?" and "What do you want built?" (up to 2,000 characters). Click "Send request". Your name, email and message go to that partner only; sending a request commits you to nothing and gives them no access to your store.
- Say what you sell, what is already set up and when you want to go live — it gets you a faster, more accurate quote.
Merchant: Request sent
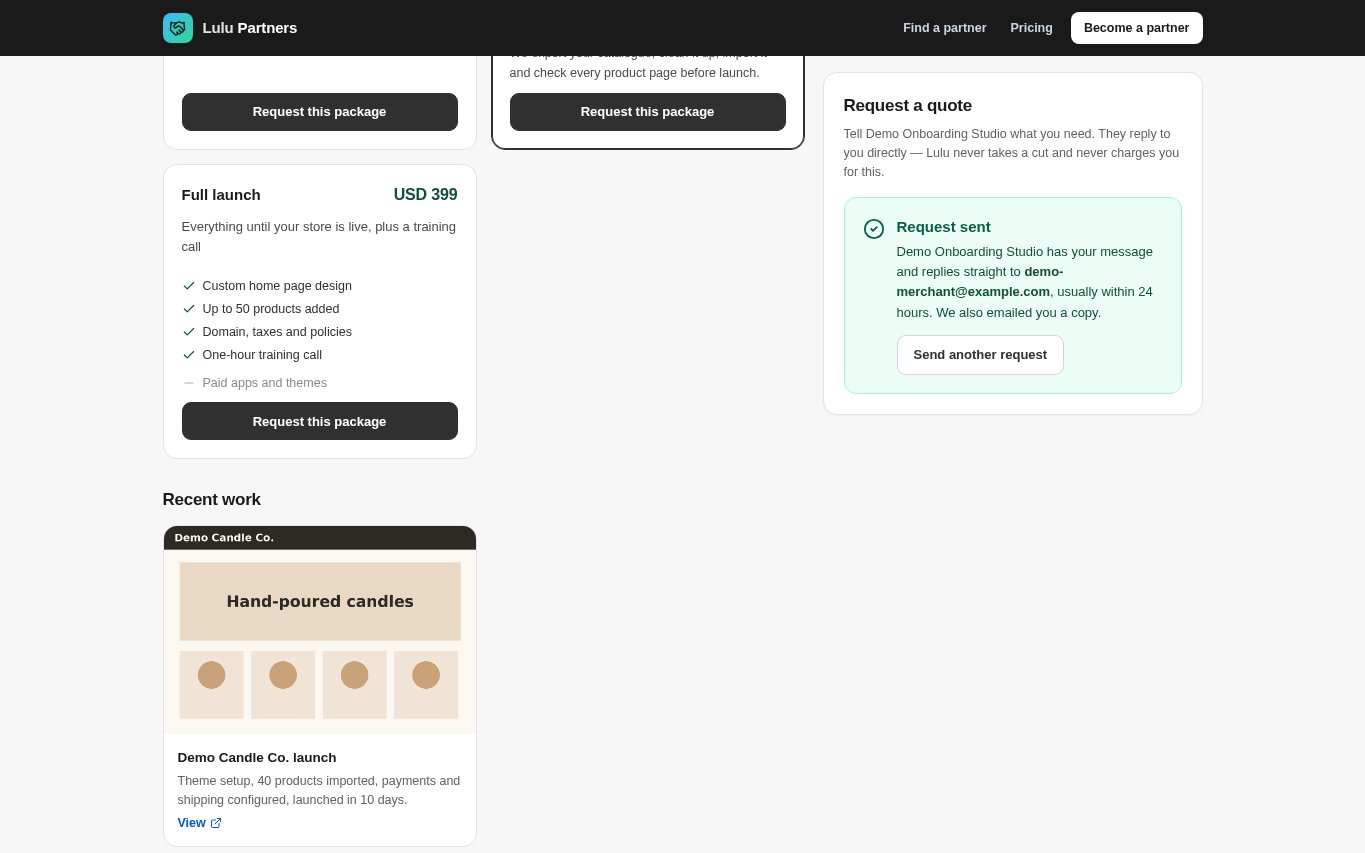
The form confirms "Request sent". A request from the public directory is not linked to a store, so it has no in-app conversation: the partner replies straight to the email you gave, usually within their stated response time. (Requests sent from your store admin — next steps — get an in-app "Messages & offers" conversation as well.) You also receive a copy by email ("We sent your request to <partner>"), and the partner receives "New request from <your name>". Click "Send another request" to contact the same partner again.
Merchant: Or hire a partner from your store admin
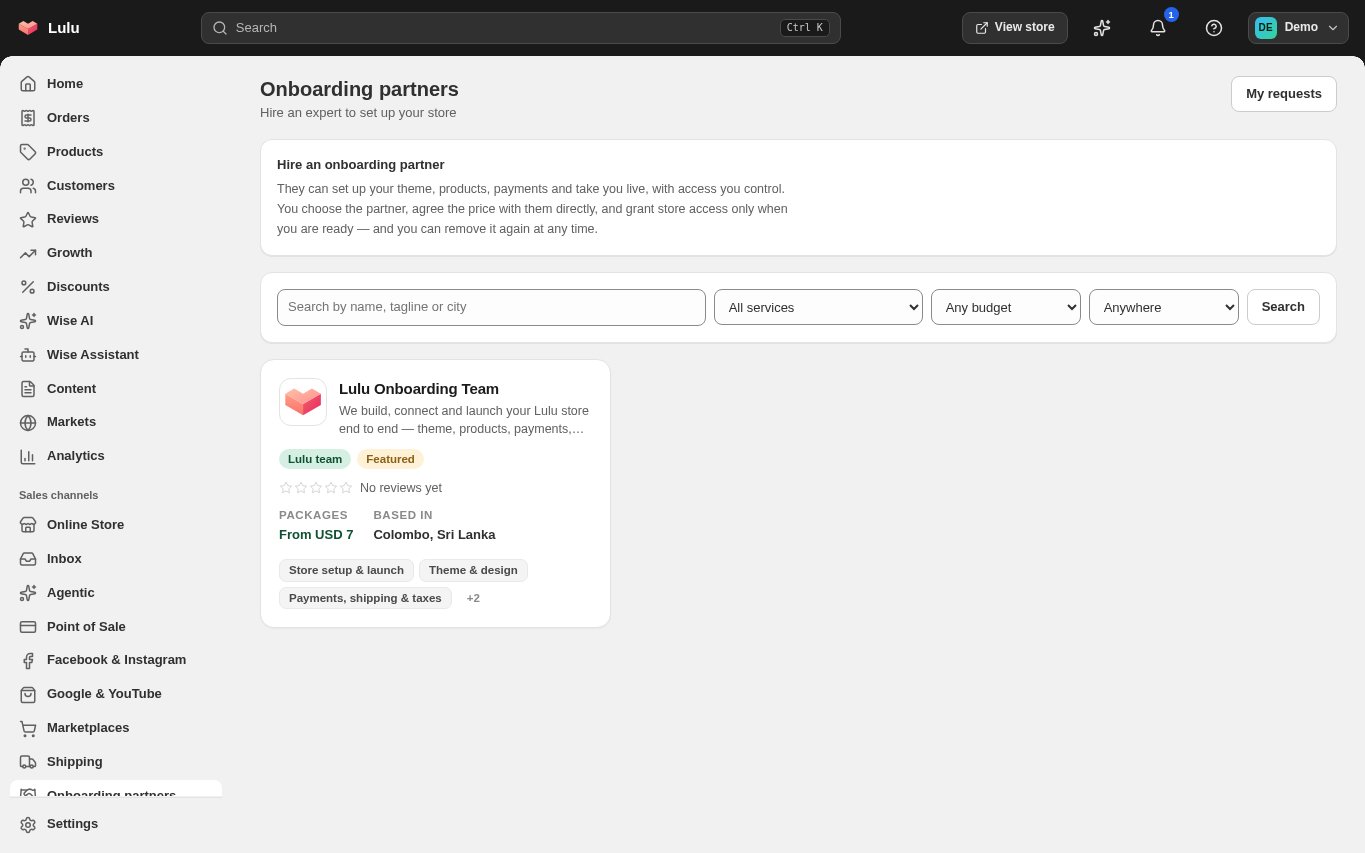
Store owners can do the same without leaving the admin: open "Onboarding partners" in the left menu ("Hire an expert to set up your store"). Before a store goes live, Home also shows the card "Set up your store yourself, or hire an onboarding partner?" with "Choose a partner" and "Set up myself". The in-admin directory has the same search and filters; click a partner to open their page.
Merchant: Send the request from the admin
On the partner's page in the admin, click "Buy this package" to pay for a fixed-price package, or "Ask for a quote" (or "Request a quote" at the top) to send a request. The request form says "Sending as <your name> (<your email>) for <your store>", so you only choose the package, service, budget and timeline, add a phone number if you like, describe the job and click "Send request". A request sent from the admin is linked to your store, which lets you grant access and leave a review later.
Merchant: Follow your requests
"Onboarding partners" → "My requests" lists every request your store has sent, with the package, the date and the status: Sent, Partner replied, Quoted, Working together or Closed. "Partner replied" appears as soon as the partner writes to you in the conversation, "Quoted" when they send an offer, "Working together" once you grant them store access or pay for an order, and "Access removed" if you later remove the access of a partner you never paid an order to on that request. Click "Messages & offers" to read and answer the partner in the admin (you also get an email when they write). From here you can also "Grant store access", "Remove access" and "Leave a review".
Partner: Open your leads inbox
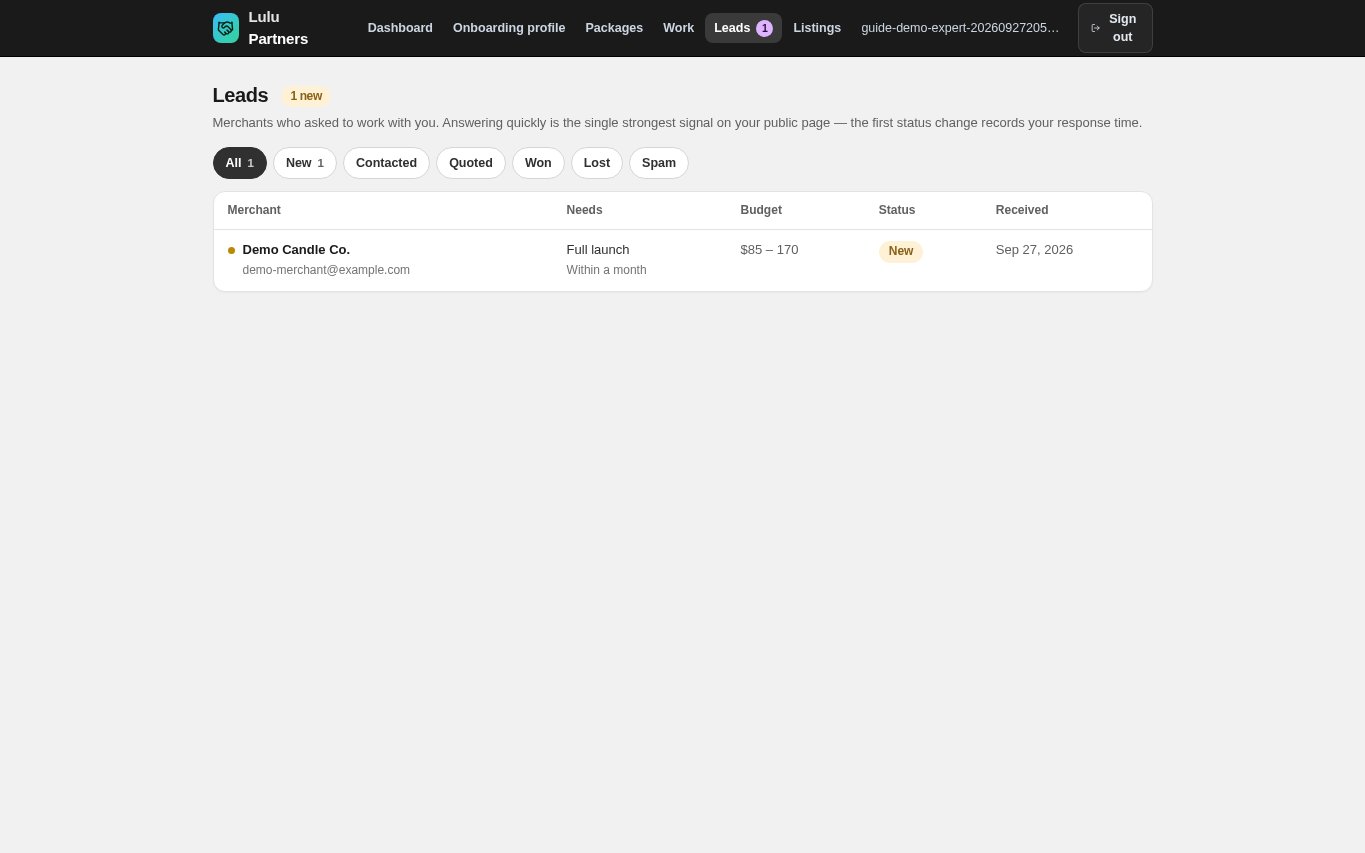
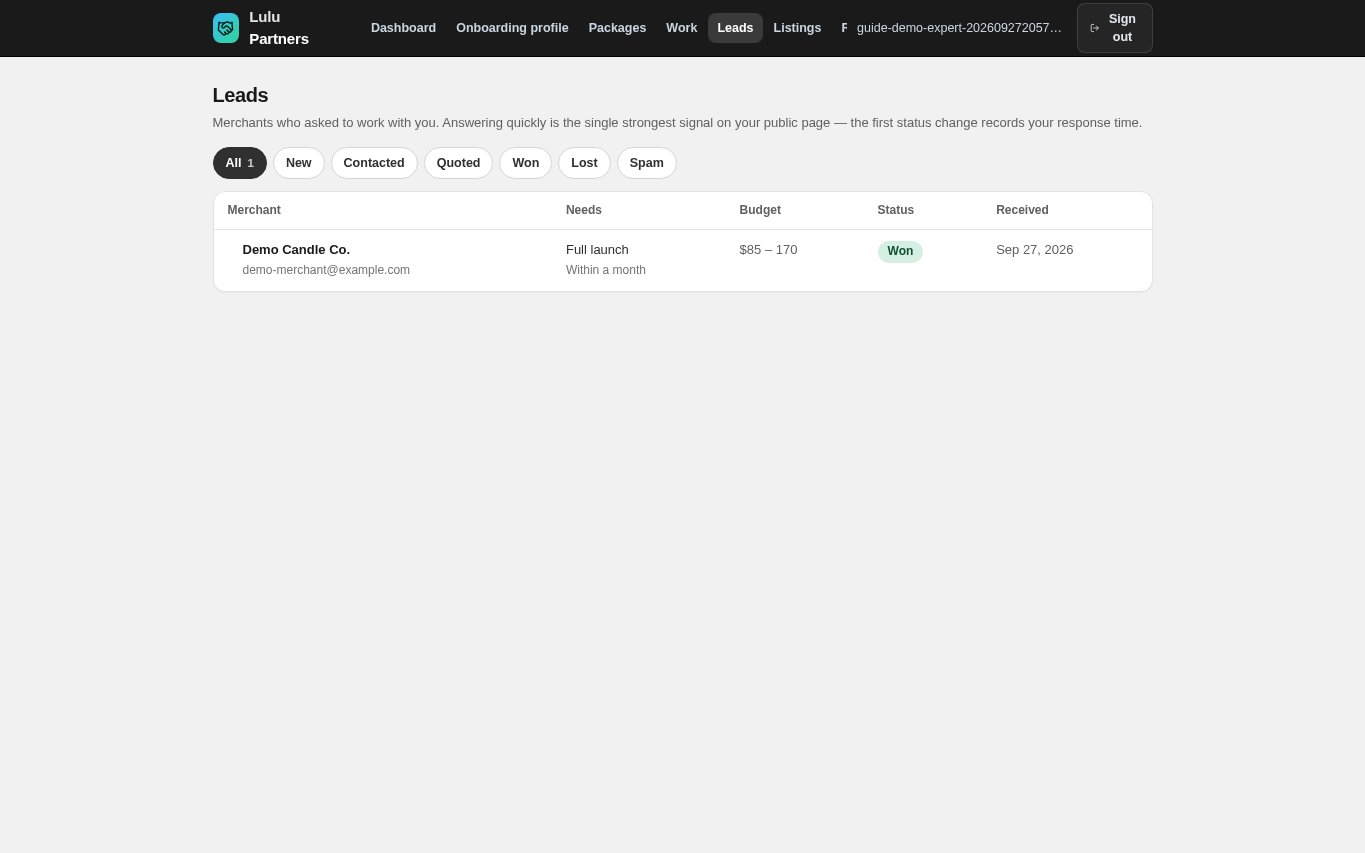
Every request arrives in "Leads" in the partner portal, and a badge on the menu counts new ones. The table shows the merchant, what they need and when, the budget, the status and when it was received. Use the filters All, New, Contacted, Quoted, Won, Lost and Spam. A new request is also emailed to your profile's contact email.
Partner: Read the request and the merchant's contact details
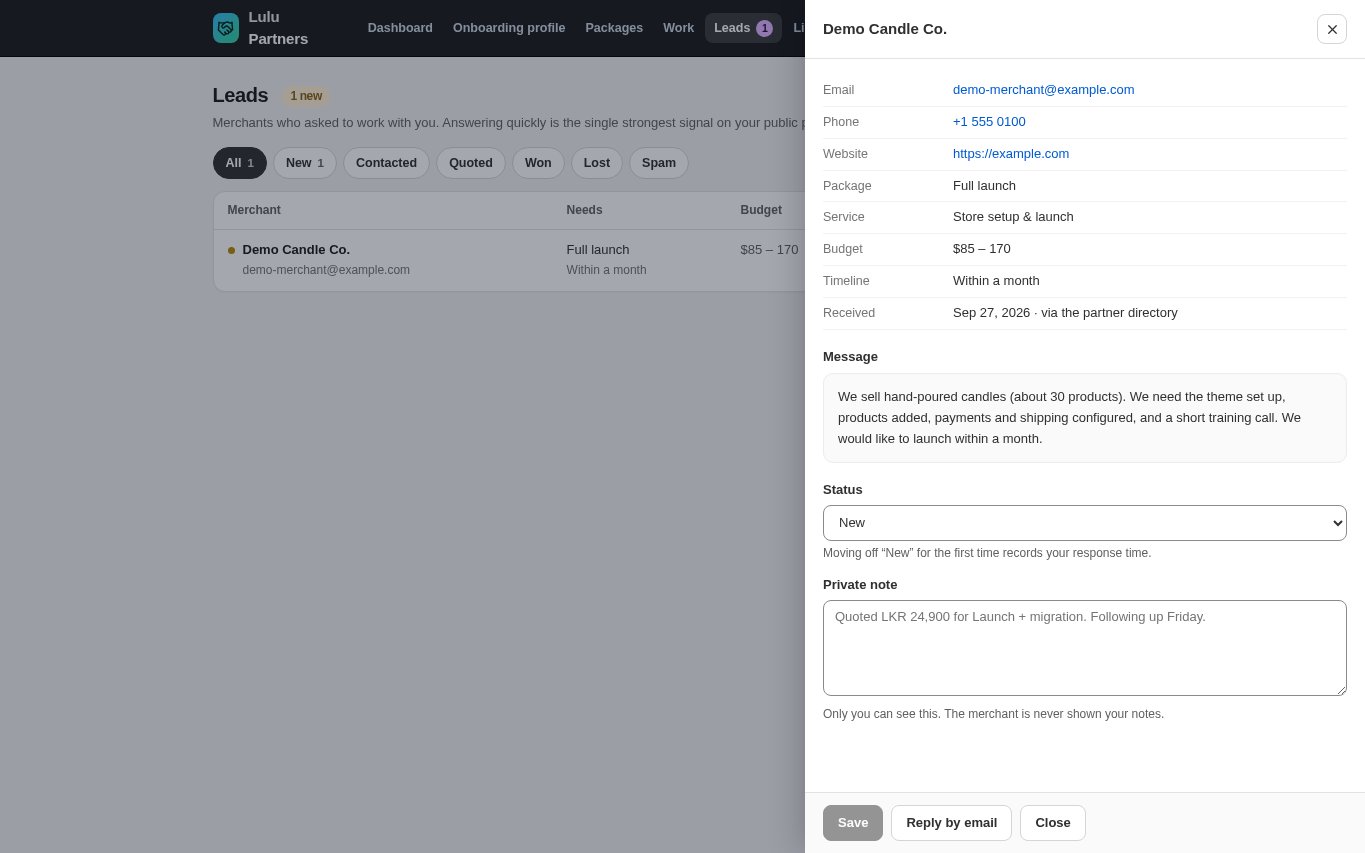
Click a lead to open it. You see the merchant's "Email", "Phone", "Store" and "Website" (whatever they filled in), the "Package", "Service", "Budget", "Timeline", when and where it was received (the partner directory or the store admin) and their "Message". These details are shared with you only because the merchant sent you the request: use them only to answer it.
Partner: Reply, set the status and keep private notes
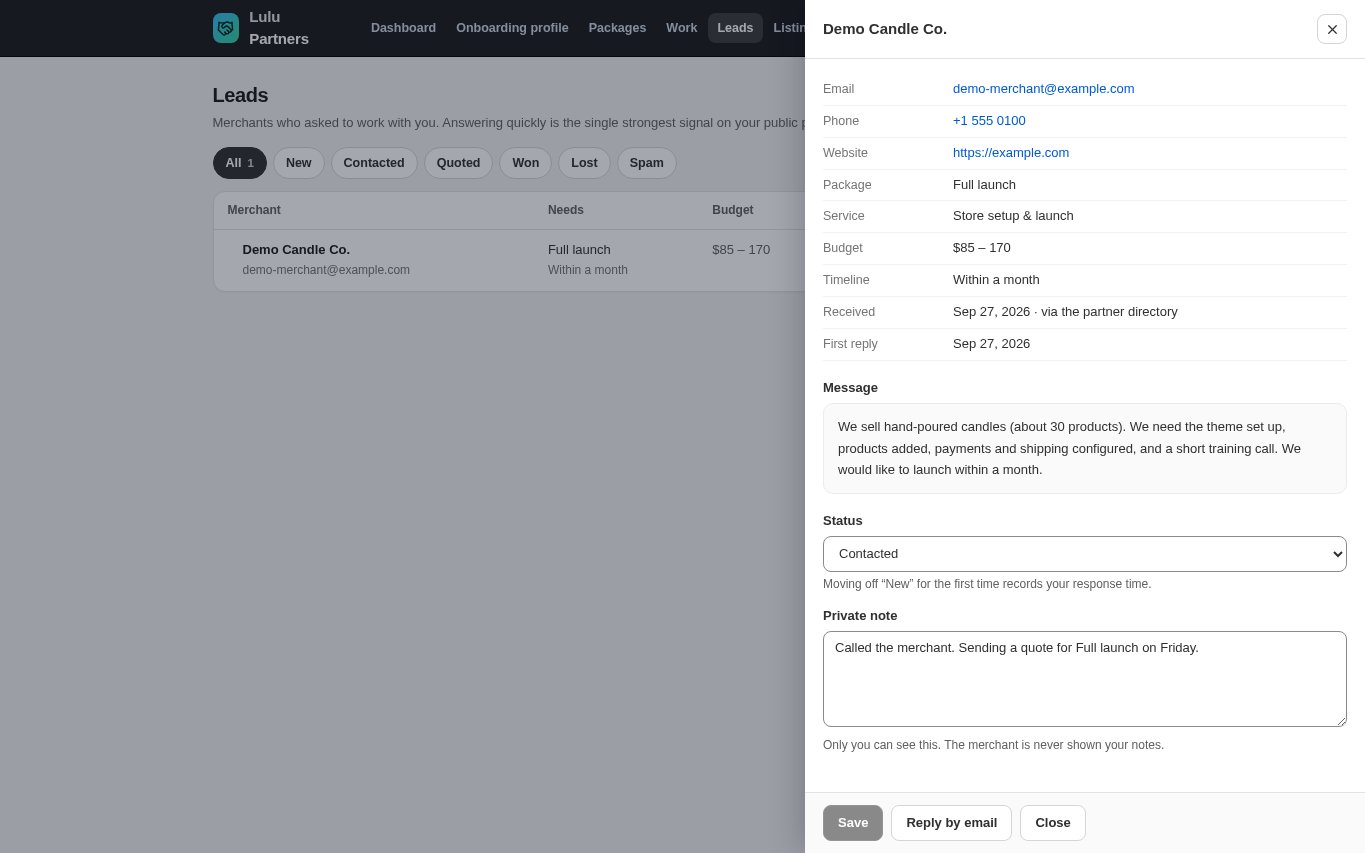
For a request sent from a store admin, answer in the request's "Messages and offers" conversation (or click "Open full conversation" to use Messages): the merchant reads it in their admin and is emailed that you wrote, and it is where you send an offer with "Send offer". Your first message moves the request from New to Contacted and records your "First reply" automatically. A request from the public directory has no store and no conversation — use "Reply by email", which opens your own email program addressed to the merchant. You can still set the "Status" yourself — New, Contacted, Quoted, Won, Lost or Spam — and write a "Private note" (the merchant never sees it), then click "Save". Answering quickly is the strongest signal on your public page.
- The merchant sees your status as: Contacted → "Partner replied", Quoted → "Quoted", Won → "Working together", Lost or Spam → "Closed".
- Some changes happen on their own: sending an offer sets Quoted, the merchant paying for an order or granting you store access sets Won.
Partner: Ask for collaborator access to the store
For a request sent from a store admin, the lead has a "Store access" section. Ask the merchant for the 4-digit "Collaborator request code" they find in their admin under Settings → Users → Collaborators, enter it with an optional message and click "Request access". The lead then shows "Access requested — waiting for the merchant to approve it". The merchant can also grant access directly from "My requests" without a code.
- After 5 wrong codes for a store, new requests to that store are locked for 60 minutes and the store is told by email. Ask the merchant for the current code and try again after the hour.
Merchant: Grant the partner access to your store
In "My requests" click "Grant store access". The dialog explains that the partner becomes a collaborator: they sign in with their own partner account — never your password — and can work on themes, products, orders, apps, shipping and store settings. They cannot manage users, change your Lulu package, approve paid app charges, see your finances or use Point of Sale, and they do not use one of your staff seats. Click "Grant access". Everything they do is recorded against their own name.
- Granting access needs the permissions to manage users and the store's package — usually the store owner.
- You can remove the access at any time under Settings → Users.
- Default access does not include exporting customers, exporting orders or exporting a store backup. The merchant can turn these on for one partner under Settings → Users → Collaborators → "Edit access".
- Access that is not used for 90 days is removed automatically. The partner gets a warning email after 75 days.
Partner: Do the onboarding work
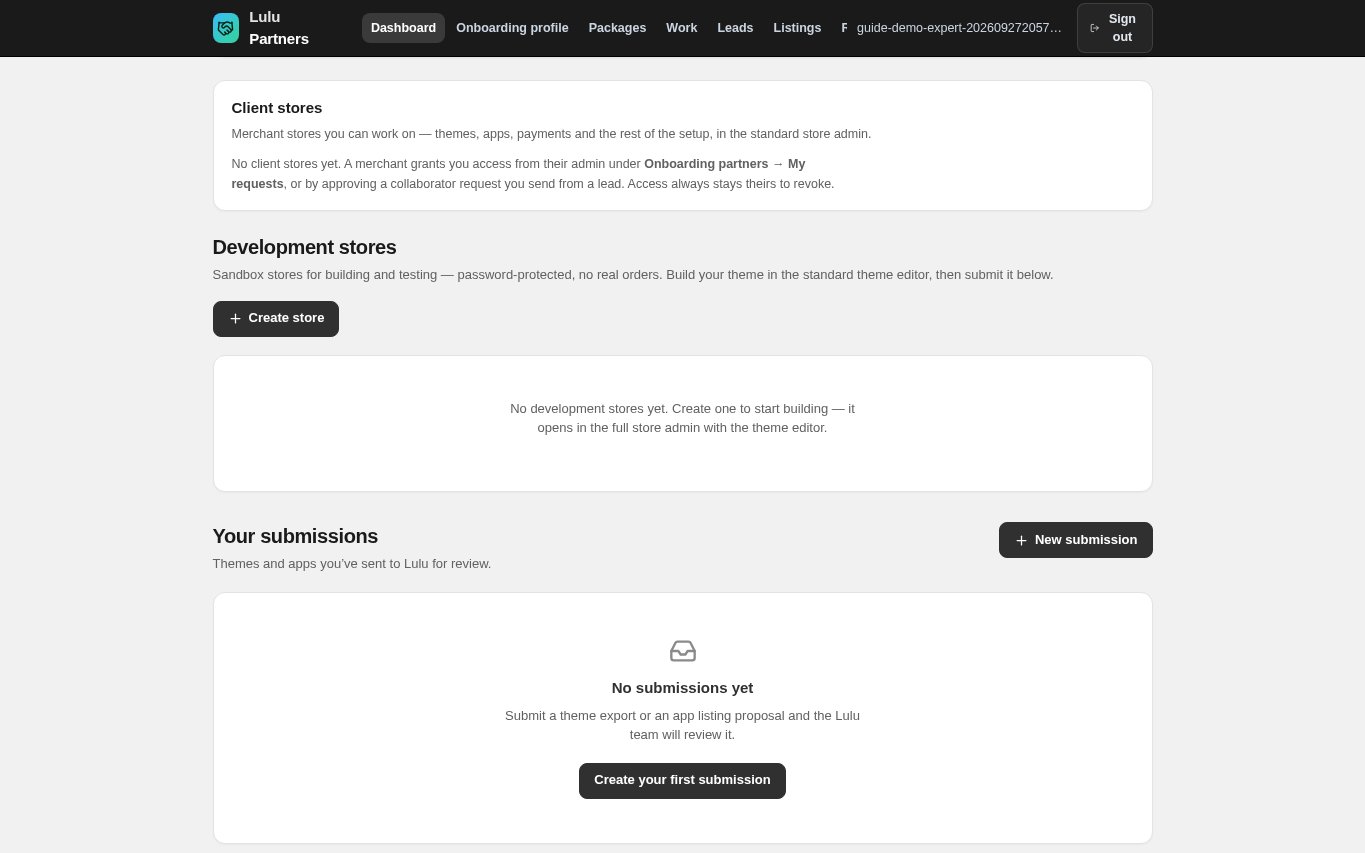
Stores that granted you access appear on your Dashboard under "Client stores"; click "Open admin" (also in the lead) to work in the standard store admin with your own login. Use "Stores" → "Create store" to prepare a theme or demo safely before touching the merchant's store: a "Dev store" to build and test (up to 250), or a "Client transfer store" to build a whole store and transfer it to the client. When the work is done, walk the merchant through their store and let them remove your access under Settings → Users when they no longer need you.
- Never ask a merchant for their password: collaborator access is the safe way in and it stays theirs to revoke.
Partner: Close the lead
When the merchant accepts and the job is under way or finished, open the lead, set the "Status" to "Won" (it is already Won if the merchant granted you access or paid an order), update your note and click "Save". Use "Lost" when the merchant chose someone else or did not go ahead, and "Spam" for junk. Closing a lead does not remove any store access — that stays with the merchant.
Merchant: Leave a review
A store that has sent a request to a partner from its admin can review them once. In "My requests" click "Leave a review", choose a rating from 1 to 5 stars, add an optional "Headline", describe "What was it like to work with them?" (at least 20 characters) and click "Publish review". Your store name is shown with the review; your email never is. The review updates the partner's rating in the directory straight away.
Partner: Reply to reviews
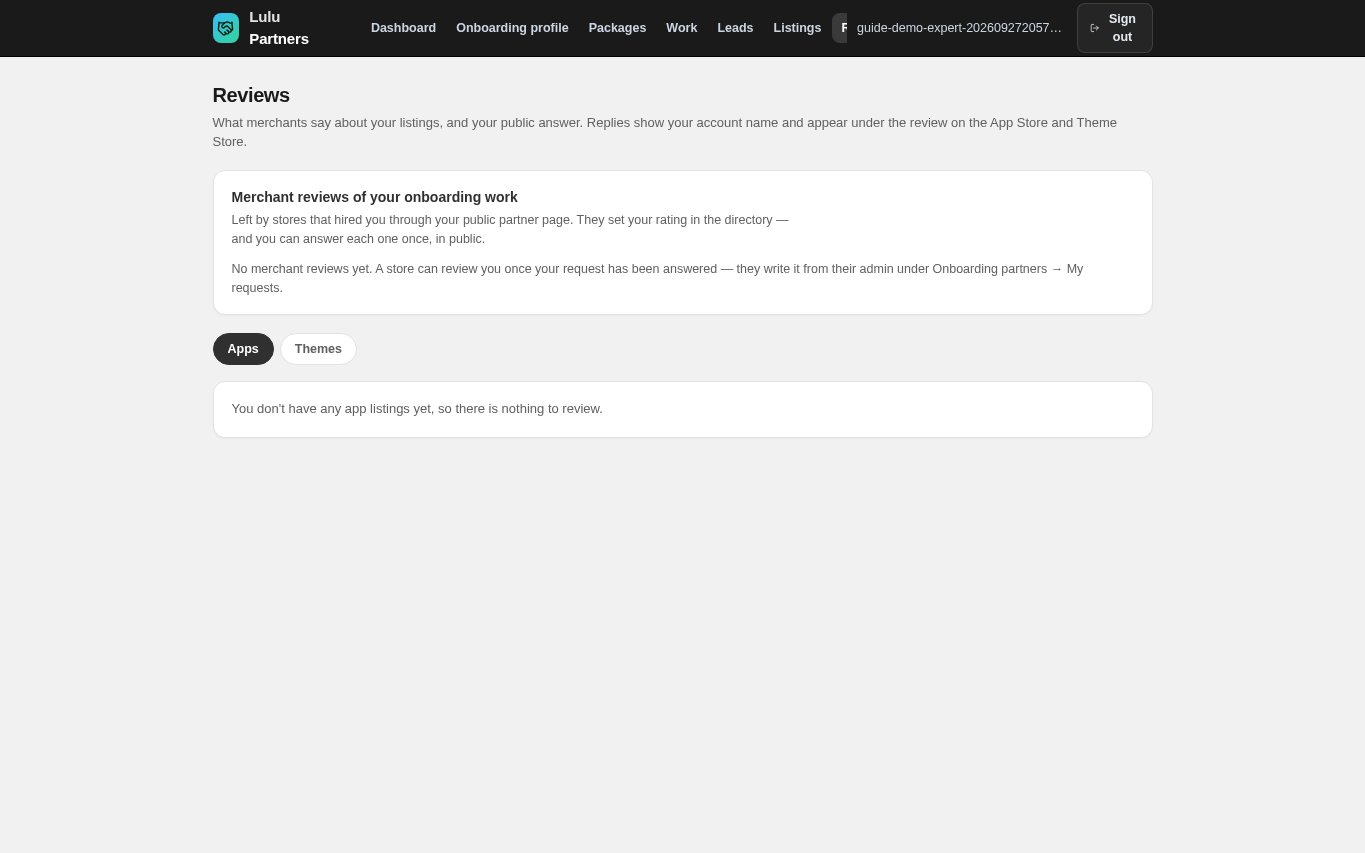
Open "Reviews" in the partner portal. "Merchant reviews of your onboarding work" lists every review with your average rating. Click "Reply", write your public answer and click "Post reply". Each review can be answered once, and the reply cannot be edited afterwards, so keep it factual and polite.
Merchant: See reviews on the partner's page
Published reviews appear on the partner's public page under "Reviews from merchants", with the star rating, the store name, the date and the partner's reply. The average rating and number of reviews are shown on the partner's card in the directory.
Partner: Pause new work or unlist your profile
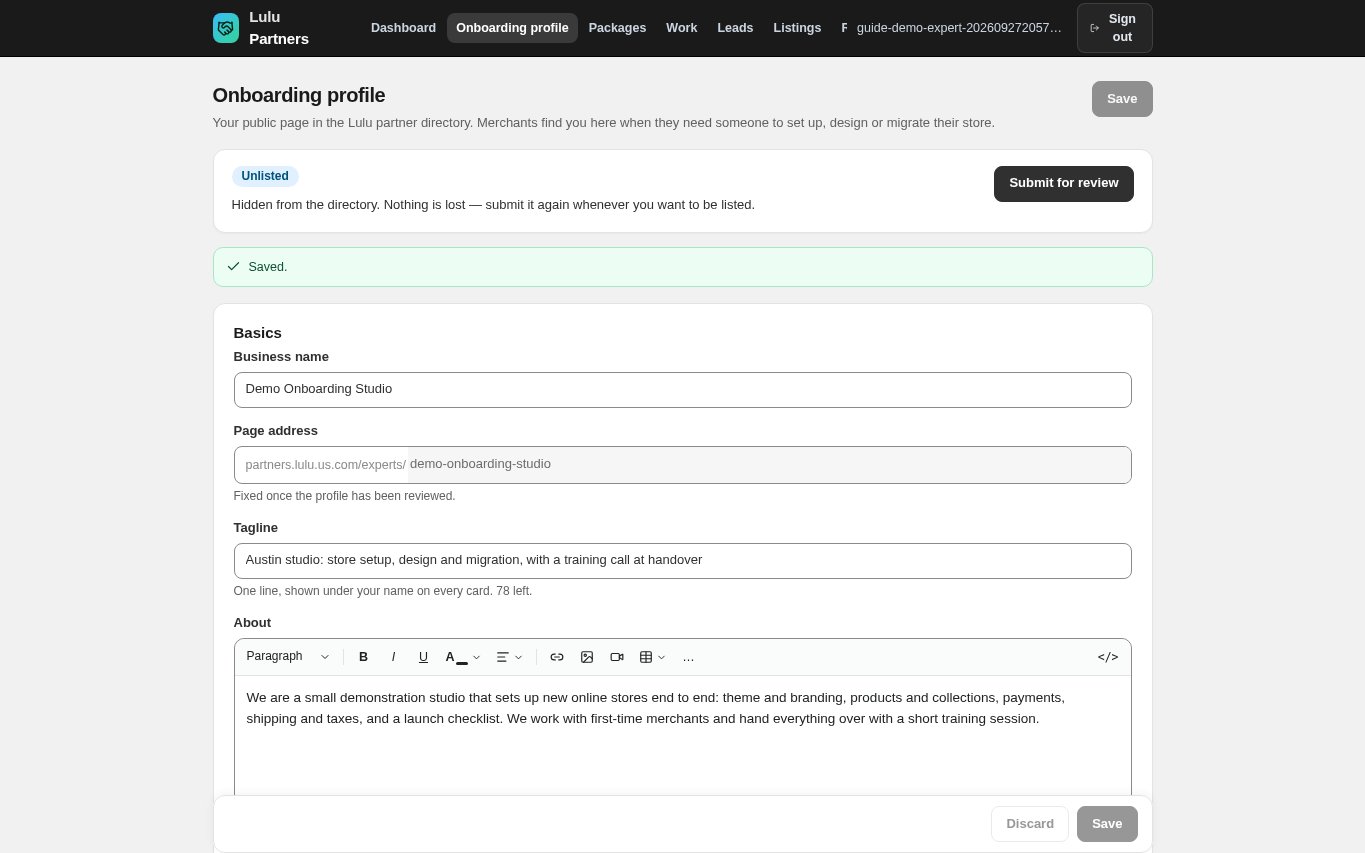
If you are fully booked, set "Taking on new clients" to "Not right now" on your Onboarding profile: your page stays live but shows "Not taking new clients". To disappear from the directory completely, click "Unlist"; the status becomes "Unlisted" and nothing is lost — packages, work, leads and reviews stay. Click "Submit for review" when you want to be listed again. Archive packages you no longer offer.
CHECK YOUR WORK
You’re ready when…
- At least one active package with a clear price, delivery time and what is and is not included.
- Your packages appear on partners.lulu.us.com/experts/your-address in the order you want.
- New requests show in Leads and arrive at your contact email; you move each one off New quickly.
- For each client, you work through collaborator access — never with the merchant's password.
- Finished jobs are marked Won, and the merchant has removed or kept your access deliberately.
IF SOMETHING DOESN’T LOOK RIGHT
Troubleshooting
Partner: "Add package" is disabled.
You already have 12 active packages. Archive one you no longer offer, then add the new one.
Partner: I am not receiving any requests.
Check that your onboarding profile is Published (not In review or Unlisted), that "Taking on new clients" is set to "Yes", and that the contact email under "How merchants reach you" is correct. Also check your spam folder for "New request from …".
Partner: the lead has no "Store access" section.
Store access can only be requested from leads that were sent from a store admin, because only those are linked to a store. Ask the merchant to grant access from Onboarding partners → My requests after sending the request from their admin, or to approve a collaborator request in Settings → Users → Collaborators.
Merchant: "Grant store access" gives a permission error.
Granting access requires permission to manage users and the store's package, and you cannot hand over more than you have yourself. Ask the store owner to grant it.
Merchant: I can't find "Leave a review".
Reviews are only possible for a partner your store sent a request to from the admin, and each store can review a partner once. If you already reviewed them, the request shows "Reviewed".
Merchant: the request form says "Too many requests. Try again in a minute".
The form accepts a few requests per minute to prevent spam. Wait a minute and click "Send request" again; your answers are still in the form.